 AFI
AFI
Microsoft Dynamics 365 & Dataverse
Microsoft Dynamics 365 is Microsoft’s enterprise CRM and ERP platform built on the Dataverse data store. Advanced Form Integration creates and updates Contacts, Leads, and Accounts in Dynamics 365 from your WordPress form submissions using the Dataverse Web API (OData v4).
What you’ll need
- An active Dynamics 365 environment.
- An Azure AD App Registration with client credentials (see below).
- A Power Platform Application User inside Dynamics linked to your Azure app.
- The Advanced Form Integration plugin installed and activated.
Authentication: Azure AD Client Credentials
Dynamics 365 uses server-to-server OAuth2 via Azure Active Directory (now Microsoft Entra ID). AFI uses the client_credentials grant flow, which means no user login is required. The token is automatically cached and refreshed before expiry.
Step 1: Register an app in Azure
- Sign in to portal.azure.com.
- Go to Microsoft Entra ID → App registrations → New registration.
- Name it (for example, “AFI Dynamics”), leave the redirect URI blank, and click Register.
- On the Overview blade, copy the Application (client) ID and Directory (tenant) ID.
Step 2: Create a client secret
- Go to Certificates & secrets → New client secret.
- Copy the Value column (not the Secret ID). It is shown only once.
Step 3: Grant API permissions
- Go to API permissions → Add a permission → Dynamics CRM → Application permissions → user_impersonation.
- Click Add, then click Grant admin consent.
Step 4: Create an Application User in Power Platform
This step is critical. Azure decides whether your app can ask for a Dynamics token; Dynamics decides whether that token grants access to records. Both are required.
- Go to admin.powerplatform.microsoft.com.
- Navigate to Environments → your environment → Settings → Users + permissions → Application users → New app user.
- Pick your Azure app, a Business Unit, and assign a Security Role (for example, “System Administrator” for testing, or a custom role with write access to the entities you need).
Step 5: Connect in AFI
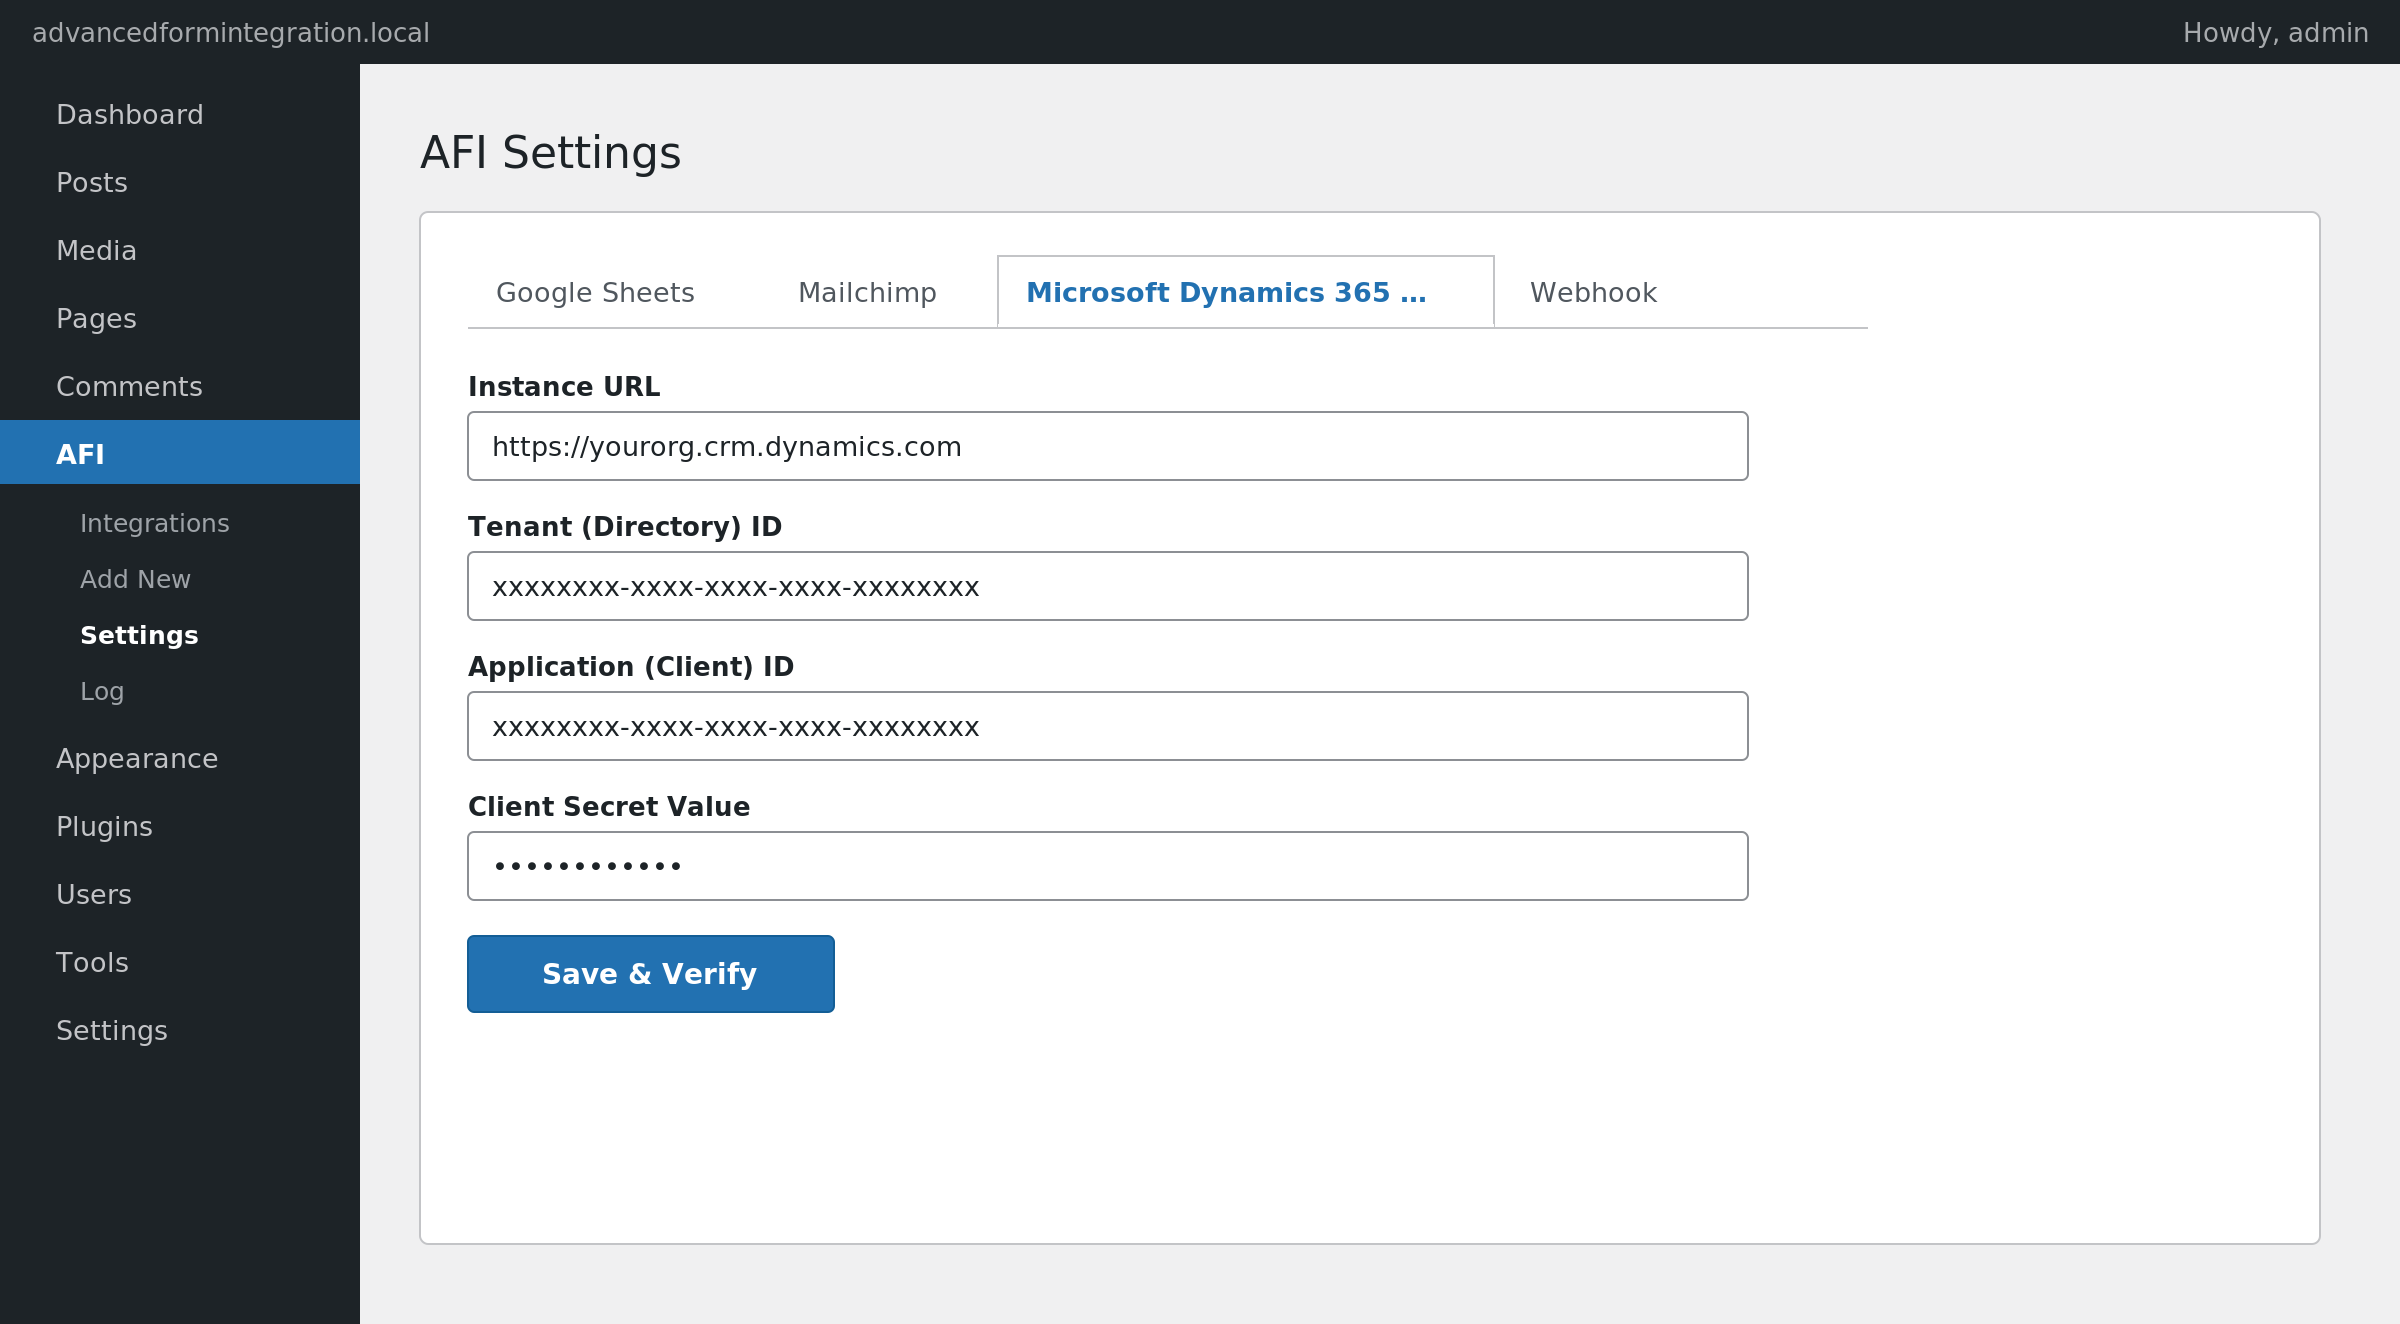
- In WordPress, go to AFI → Settings → Dynamics 365 CRM.
- Enter your Instance URL (for example,
https://yourorg.crm.dynamics.com). - Enter the Tenant (Directory) ID, Application (Client) ID, and Client Secret Value.
- Click Save & Verify. AFI will fetch a token and call
WhoAmI()to confirm access.
AFI automatically detects sovereign clouds (GCC, China) from the instance URL and routes token requests to the correct login host.
Create the integration
- Go to AFI → Add New.
- Give the integration a name, for example
Lead form to Dynamics 365. - Under Trigger, pick the form plugin and the specific form.
- Under Action → Platform, select Dynamics 365 CRM.
- In Task, choose one of: Create / Update Contact, Create / Update Lead, or Create Account.
- Pick the saved account in the Dynamics 365 Account dropdown.
- Map your form fields onto the Dataverse fields.
- Optional: open Conditional Logic to limit which submissions are sent.
- Click Save Integration.
Tasks supported
Create / Update Contact (by email)
Creates a contact in Dataverse via POST /contacts. If a contact with the same emailaddress1 already exists, AFI updates their fields via PATCH /contacts(guid) instead of creating a duplicate.
| Field | Field key | Required | Notes |
|---|---|---|---|
| First Name | firstname |
No | |
| Last Name | lastname |
No | |
| Primary Email | emailaddress1 |
Yes | Used for upsert matching |
| Secondary Email | emailaddress2 |
No | |
| Business Phone | telephone1 |
No | |
| Mobile Phone | mobilephone |
No | |
| Address fields | address1_line1, address1_city, address1_stateorprovince, address1_postalcode, address1_country |
No | |
| Job Title | jobtitle |
No | |
| Department | department |
No | |
| Company Name | companyname |
No | Free text |
| Account Name (link) | parentcustomerid_account |
No | Looks up Account by name and links contact |
| Website | websiteurl |
No | |
| Lead Source | leadsourcecode |
No | Option set integer value |
| Do Not Email | donotemail |
No | Boolean: true/false |
| Owner ID | ownerid |
No | Systemuser GUID, auto-converted to OData bind |
Create / Update Lead (by email)
Creates a lead via POST /leads. If a lead with the same emailaddress1 exists, AFI patches it. The subject (Topic) field is required by Dynamics; AFI auto-generates a default from the contact’s name or company if not mapped.
| Field | Field key | Required | Notes |
|---|---|---|---|
| Topic / Subject | subject |
Yes | Auto-generated from name if not mapped |
| First Name / Last Name | firstname, lastname |
No | |
emailaddress1 |
Yes | Used for upsert matching | |
| Company Name | companyname |
No | |
| Industry | industrycode |
No | Option set value |
| Estimated Revenue | revenue |
No | Number |
| Number of Employees | numberofemployees |
No | |
| Lead Source | leadsourcecode |
No | Option set |
Create Account
Creates an account via POST /accounts. The name field is required.
| Field | Field key | Required | Notes |
|---|---|---|---|
| Account Name | name |
Yes | |
| Account Number | accountnumber |
No | |
| Email / Phone / Fax | emailaddress1, telephone1, fax |
No | |
| Website | websiteurl |
No | |
| Industry | industrycode |
No | Option set |
| Annual Revenue | revenue |
No | |
| Number of Employees | numberofemployees |
No |
Type coercion
AFI automatically coerces field values to the type Dynamics expects: integer for option sets, boolean for donot* fields, float for revenue, and OData @odata.bind for lookup fields like ownerid and parentcustomerid.
Pro features
The Pro integration adds a Custom Fields repeater to every task. This lets you map any custom Dataverse column (publisher-prefixed fields like new_segment, prefix_lifecyclestage, etc.) without code changes.
How custom fields work
Pro adds a table where you enter the field’s schema (logical) name as the key and the value or trigger tag. Standard mapped fields take priority on collision, so you cannot accidentally overwrite a mapped field.
Feature comparison
| Feature | Free | Pro |
|---|---|---|
| Create/update contact, lead, account | ✅ | ✅ |
| Email-based upsert | ✅ | ✅ |
| Standard Dataverse fields | ✅ | ✅ |
| Lookup resolution (Account by name, Owner by GUID) | ✅ | ✅ |
| Custom Dataverse fields (any publisher prefix) | No | ✅ |
Conditional logic example
Only create leads for B2B submissions. Add a condition on company_name being not empty. Individual enquiries that lack a company go to a separate “Create Contact” integration.
Troubleshooting
Token request failed
AFI surfaces Azure’s error_description in the settings page and the log. Common causes: incorrect client secret (copy the Value, not the Secret ID), missing admin consent on the API permission, or wrong tenant ID.
WhoAmI succeeded but record creation fails
The token is valid but the Application User lacks write access to the target entity. Go back to Power Platform and verify the security role includes write privileges on contact, lead, or account.
Nothing arrives in Dynamics
Open AFI → Log and find the most recent entry. AFI stores the full request URL, headers (with redacted token), body, and the raw Dynamics response including OData error details.