 AFI
AFI
Google Sheets
Google Sheets is the most-used AFI receiver, and one of the quickest to set up. Connect once via OAuth and every matching form submission, WooCommerce order, or user signup writes a fresh row to the spreadsheet you choose. The OAuth + Google API setup below is one-time; afterwards, new sheets are pickable from a dropdown.
Supported actions
- Add New Row (Free + Pro): append a row to a chosen worksheet with mapped fields. Every form submission becomes a new row, with column values pulled from your field mapping plus any smart tags you’ve added.
AFI Pro adds richer field mapping for Google Sheets: more sender-plugin field types (phone, date, dropdown, hidden, custom fields) are exposed in the mapping panel, so you can populate more columns from any form.
Quick reference
| Need to… | Do this |
|---|---|
| Send form data to a sheet | Create integration, Sender plugin, Google Sheets, Add New Row, pick the sheet + worksheet, map columns. |
| Capture the submission timestamp | Map {{_submission_date}} onto a date column. |
| Capture UTM source / GCLID | Enable Send UTM Variables in AFI > Settings > General, then map {{utm_source}} / {{gclid}} onto extra columns. |
| Route conditionally to different sheets | Create one integration per destination sheet; add a Conditional Logic rule on each. |
| Keep columns aligned with mapped fields | In your sheet’s row 1, use a header cell for each column you map. Skip any blank header cells. |
Heads up, recurring gotchas: blank columns in your sheet header shift every value by one cell; the Drive scope must be enabled on the OAuth consent screen for sheets to appear in the dropdown; and WP permalinks should be set to Post name so the OAuth callback completes successfully. The full step-by-step walkthrough (with screenshots) is below.
Authentication
First, we need to create a Google API project to grant access to the AFI plugin. Please follow the steps outlined below:
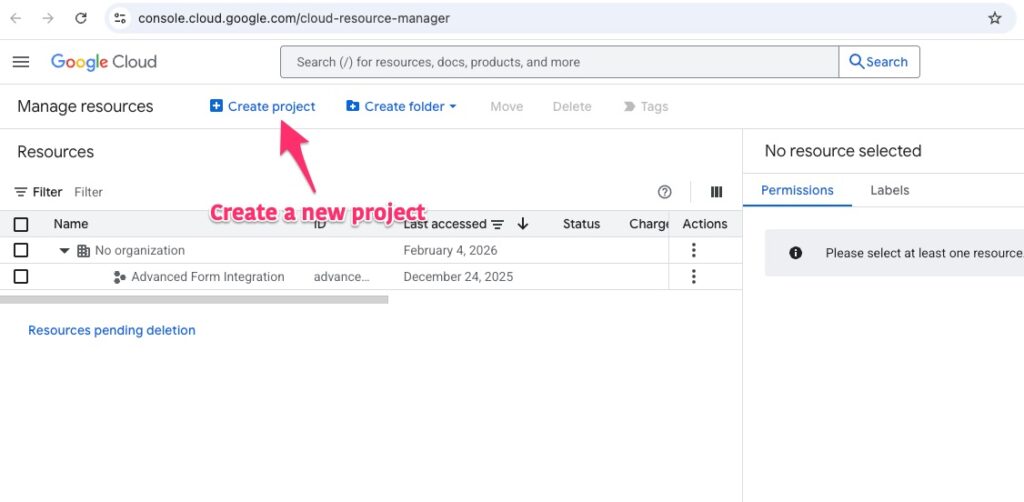
Go to Google Developer Console and create a New Project.
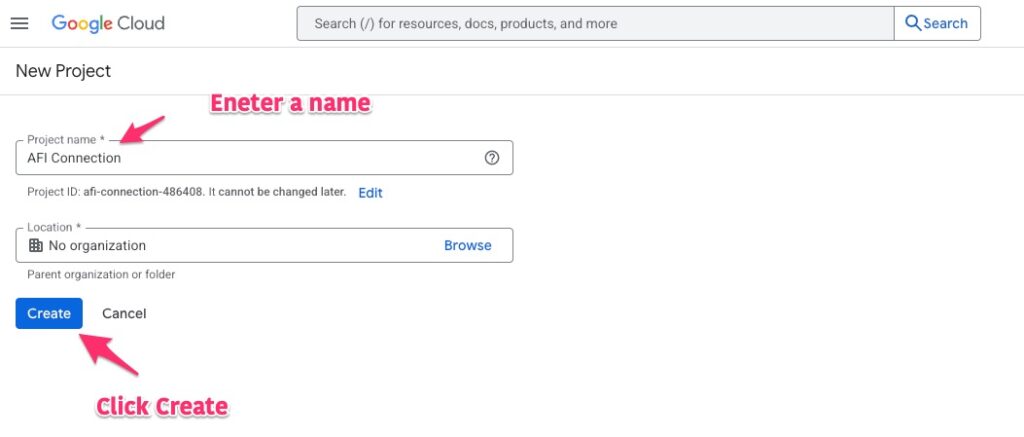
Enter an appropriate project name, then click the Create button.
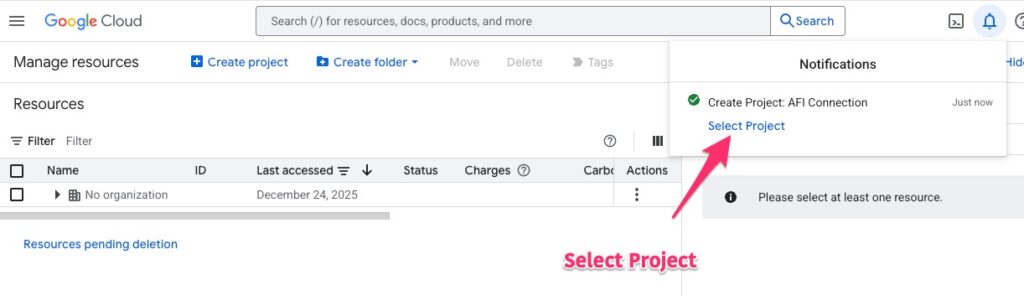
Select the project.
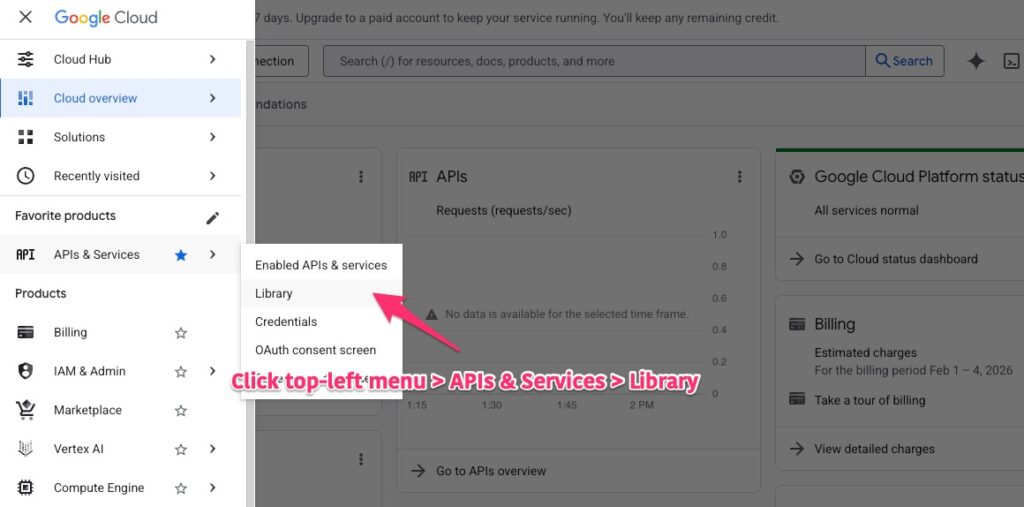
Go to Top Left Menu > APIs & Services > Library
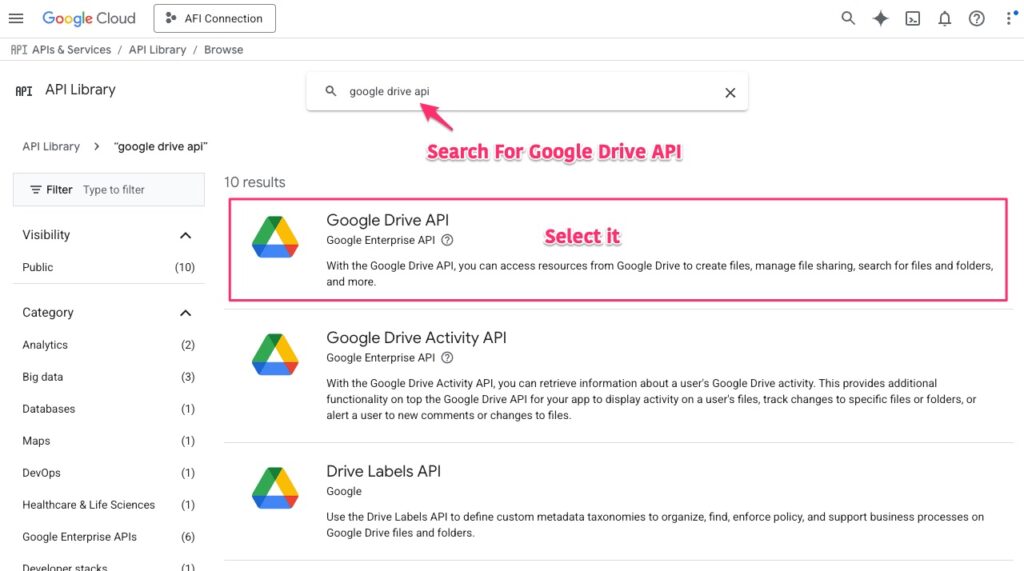
Search for Google Drive API and select it.
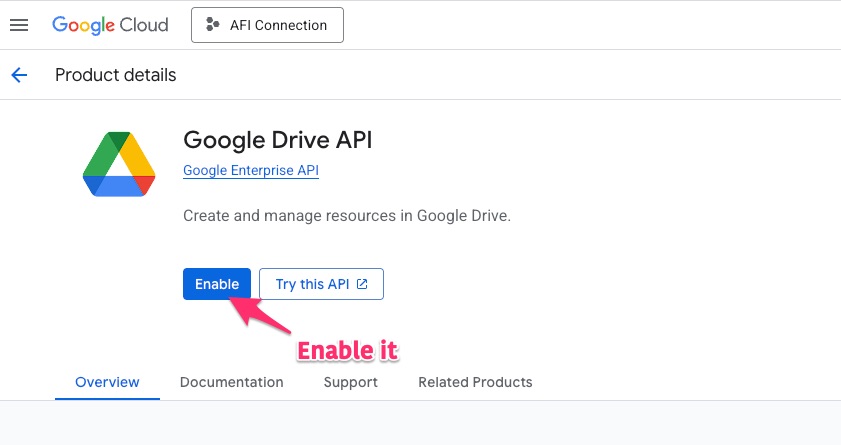
Enable Google Drive API.
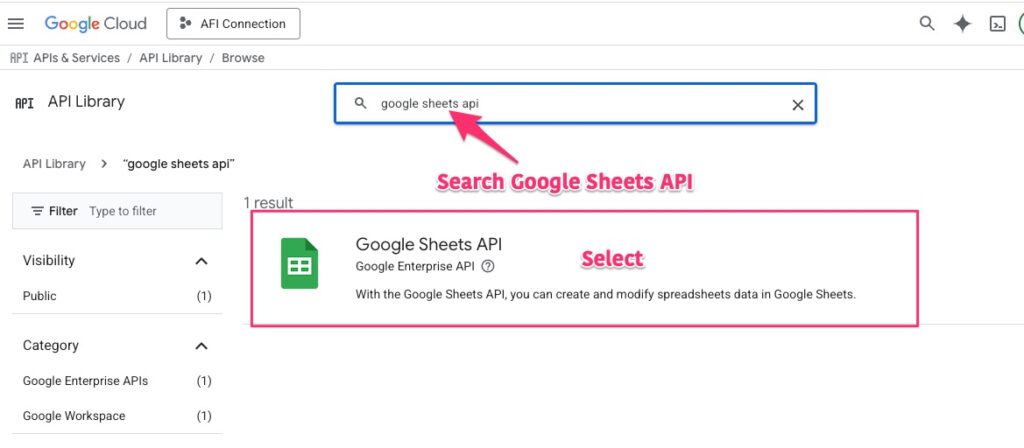
Search for Google Sheets API.
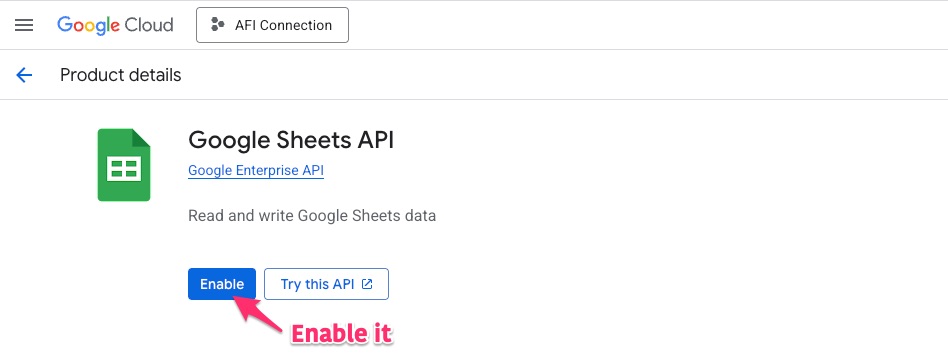
Enable Google Sheets API.
Both Google Drive API and Google Sheets API need to be enabled. Google Drive API is needed for reading the available spreadsheets list. Google Sheets API is needed to read and write data inside a spreadsheet.
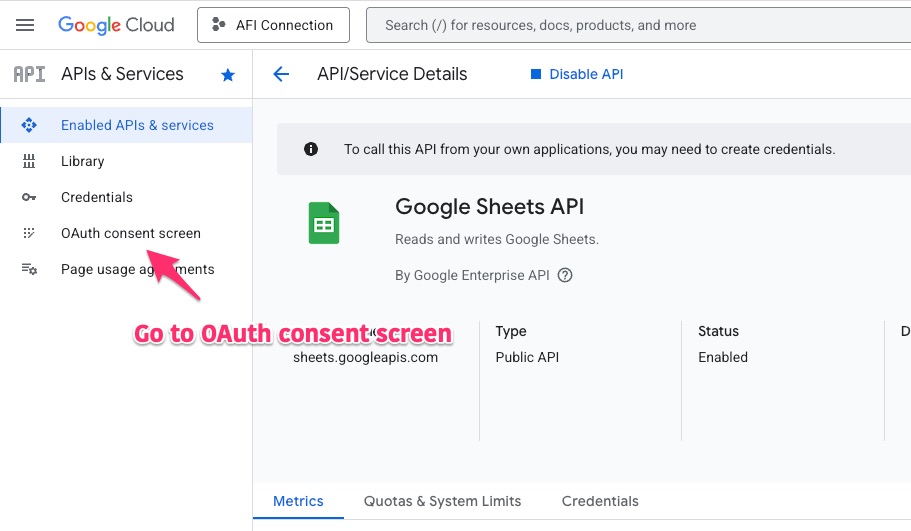
Again go to Top left menu > APIs & Services > OAuth consent screen.
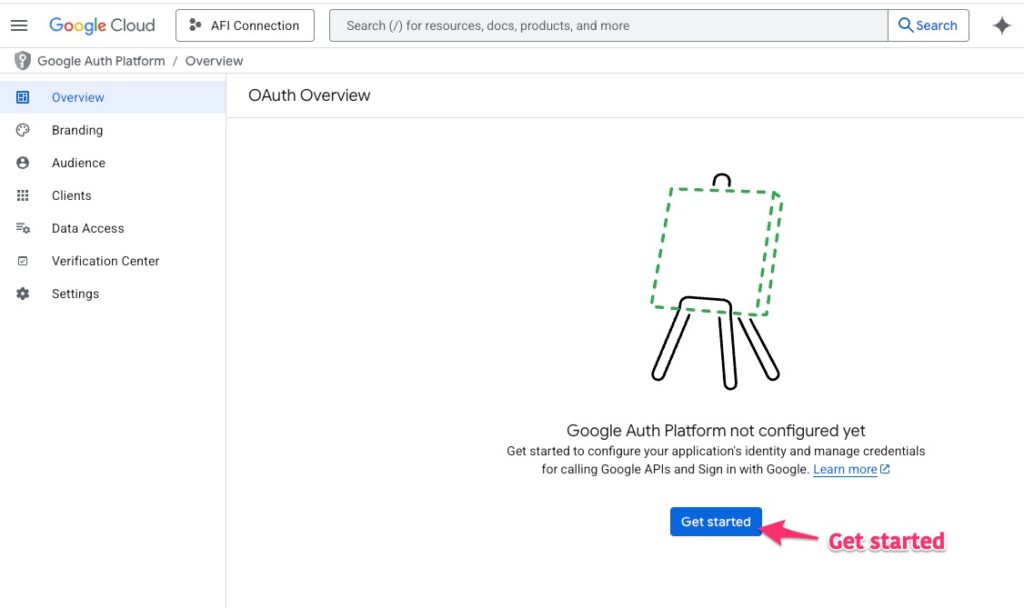
Click the Get started button.
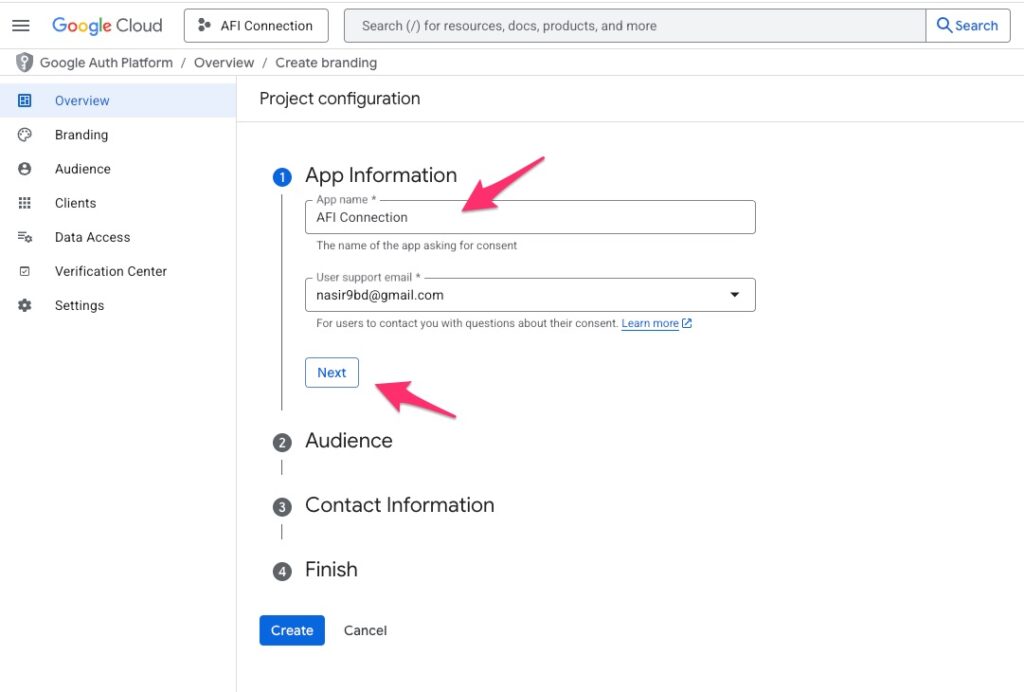
Enter an app name and your email address. Then click Next button.
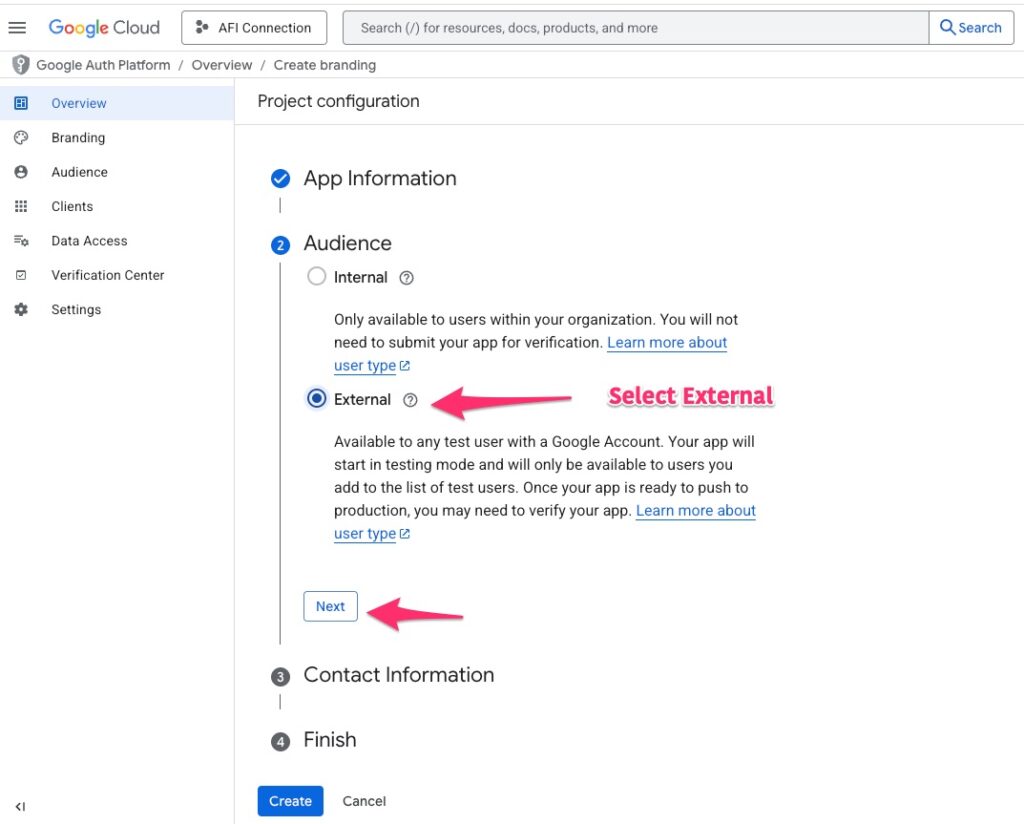
Select External and then Next.
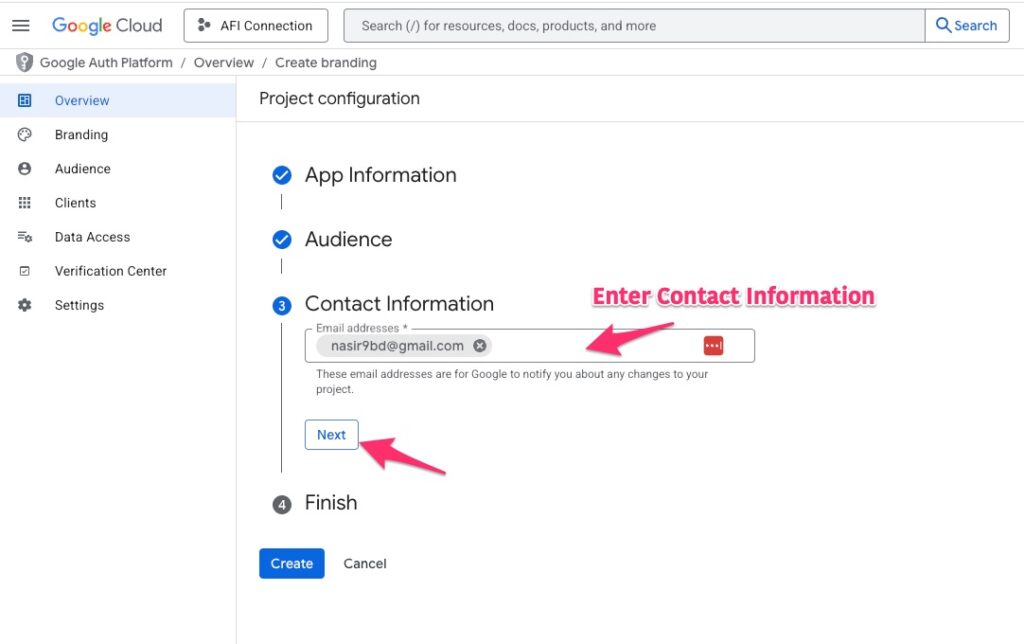
Enter Contact Information and Next.
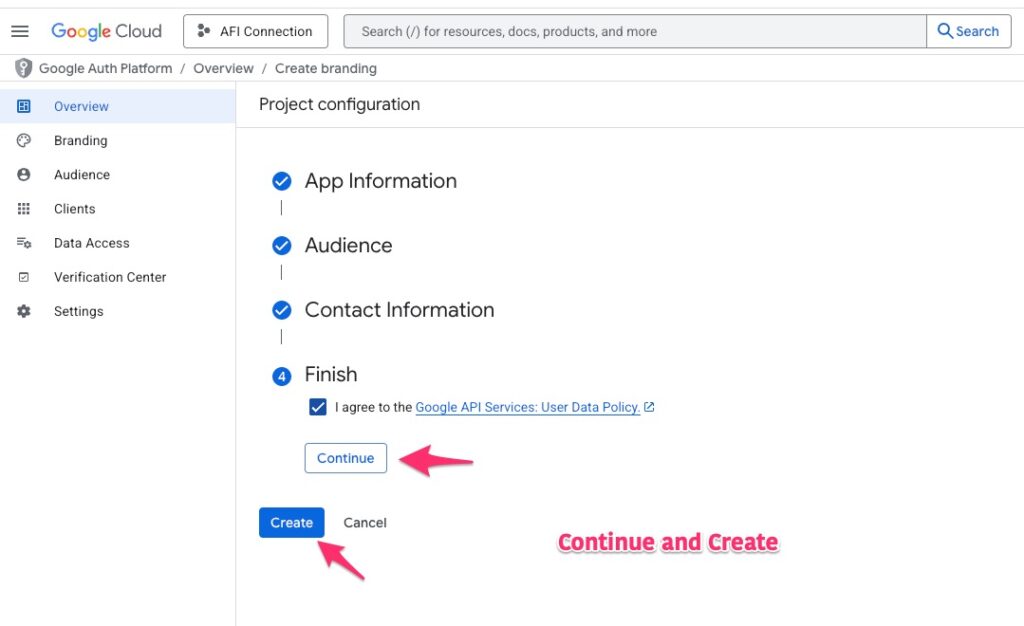
Agree to T&C and Continue. Then click Create button.
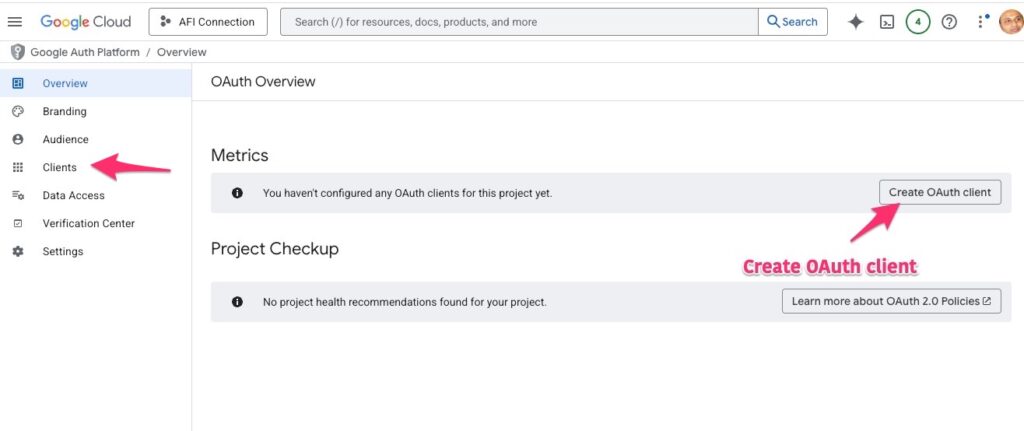
Go to Clients menu and Create OAuth client.
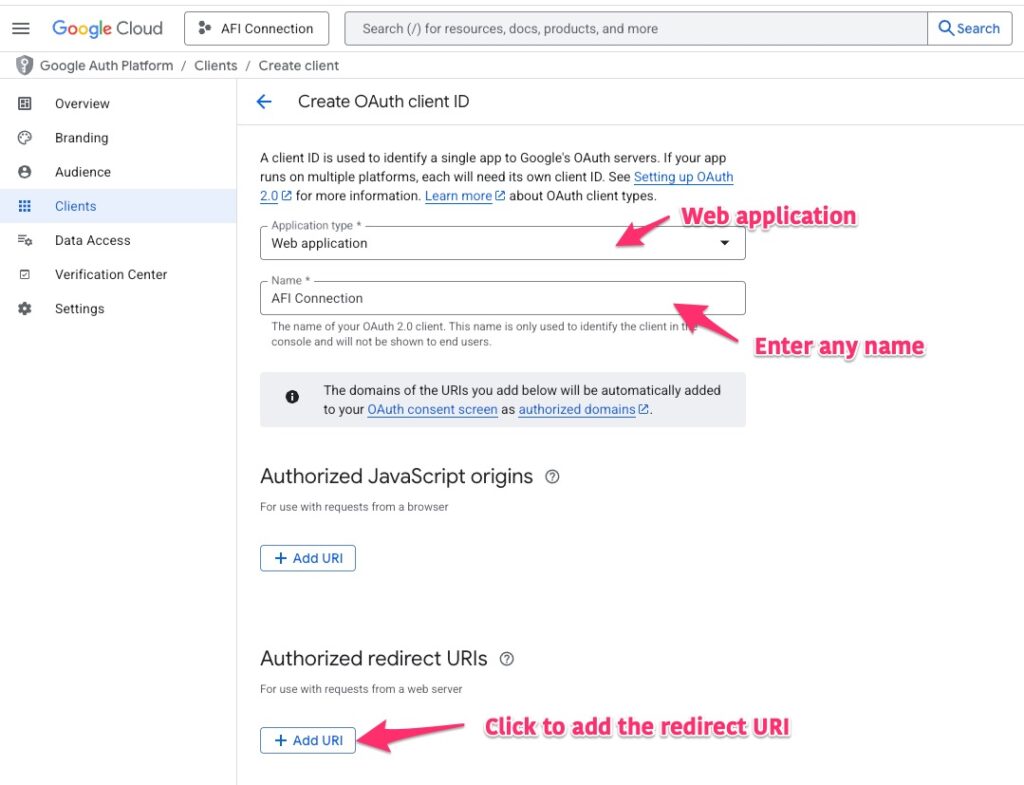
Select Web application and put a name. Under the Authorized redirect URIs section click on the Add URI button.
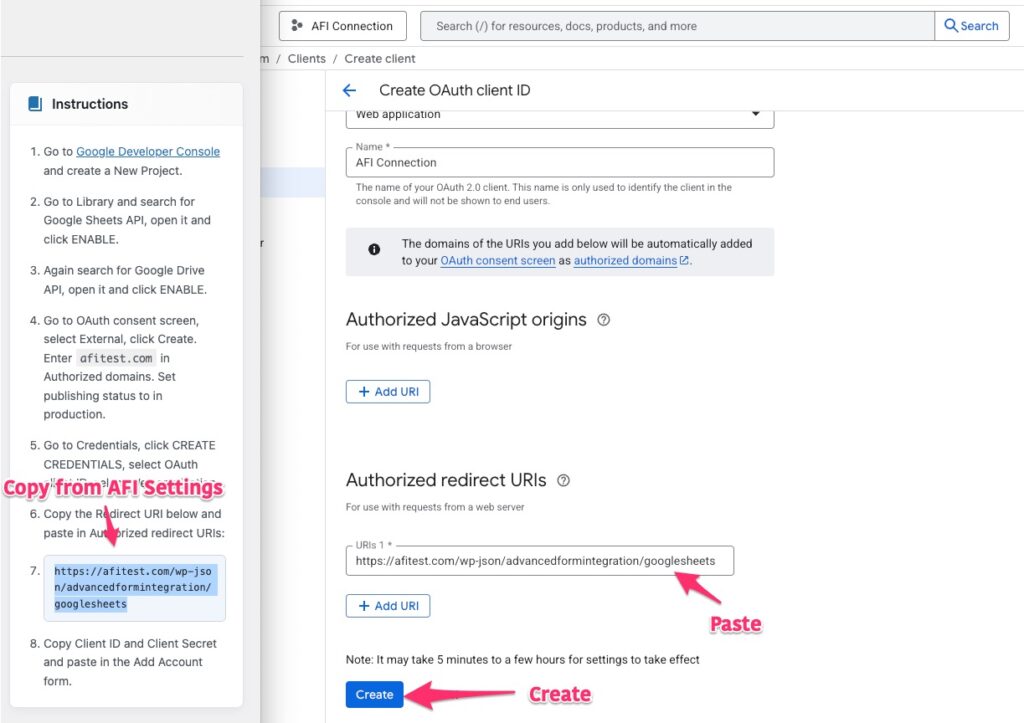
Copy the redirect URI from AFI Google Sheets settings page and paste here. Click on the Create button.
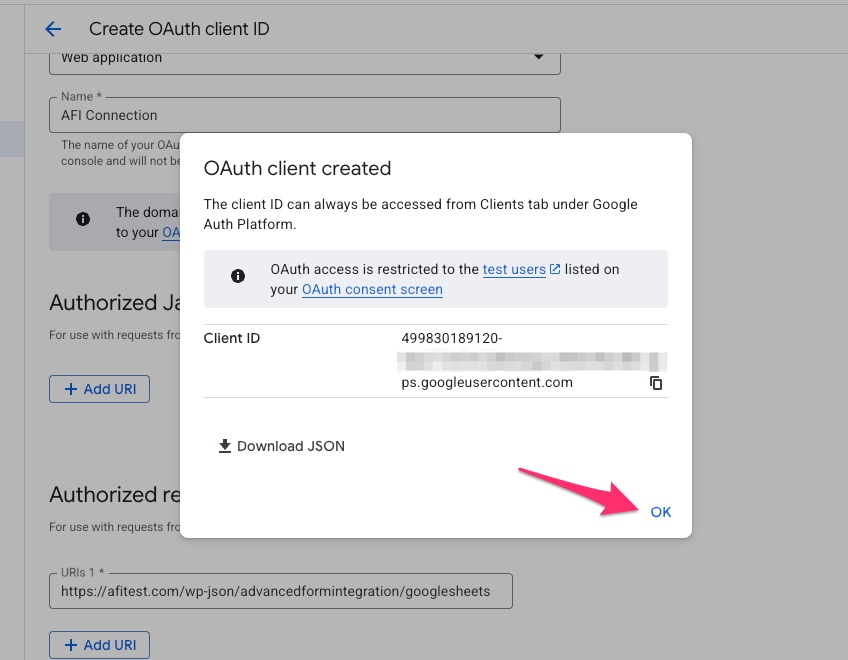
Click OK on the popup.
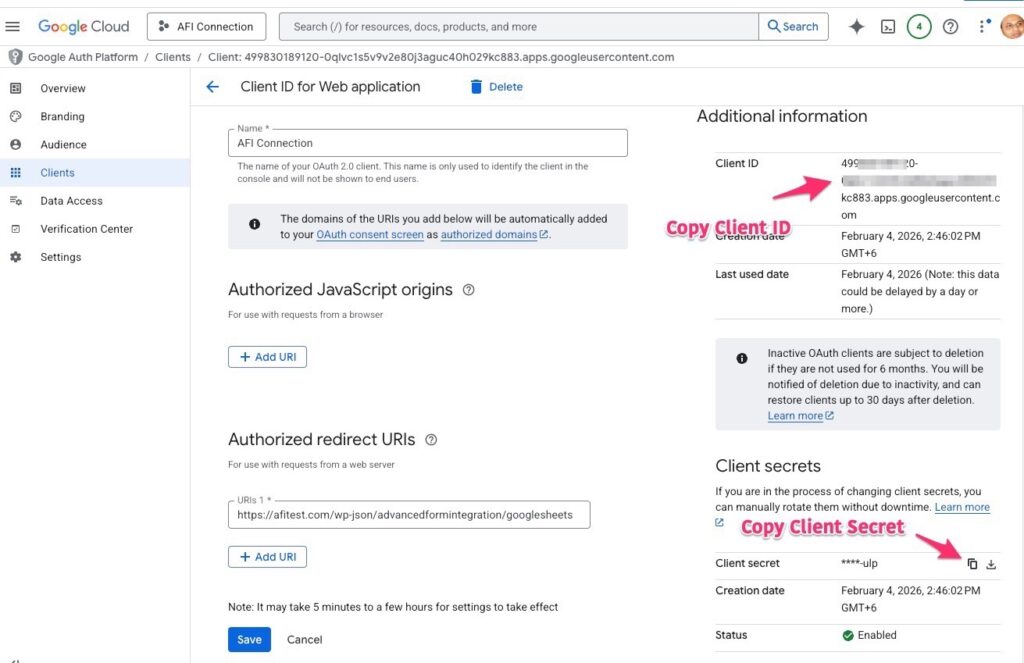
Copy both Client ID and Client Secret.
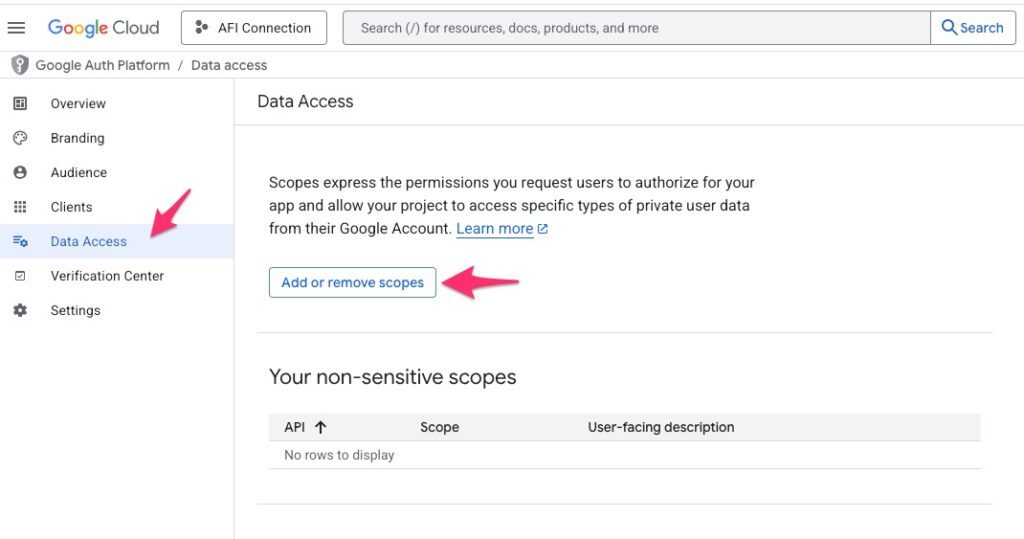
Go to Data Access menu.
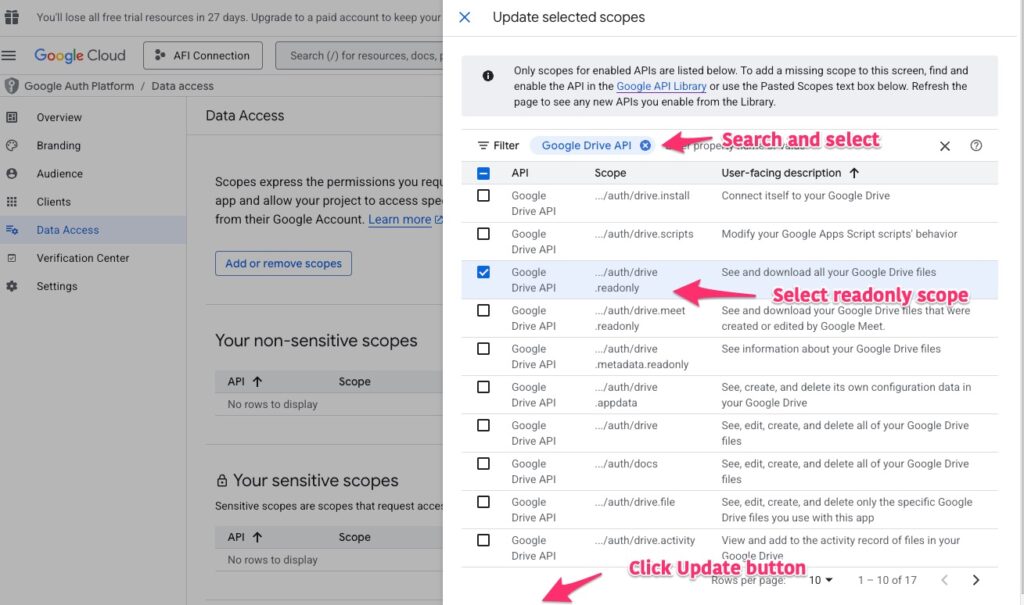
Search and select Google Drive API, mark the drive.readonly scope and click Update button.
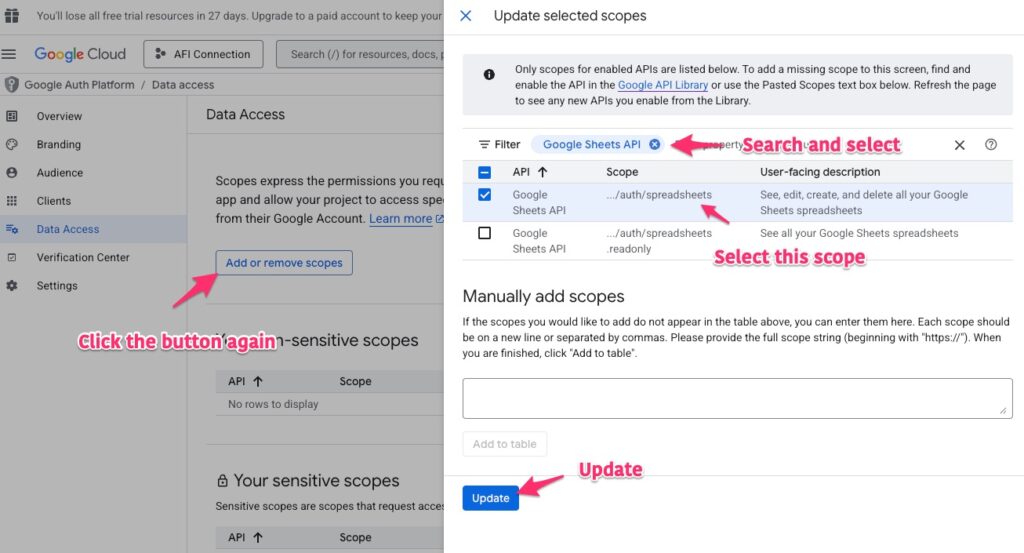
Again search and select Google Sheets API, mark spreadsheets scope and click the Update button.
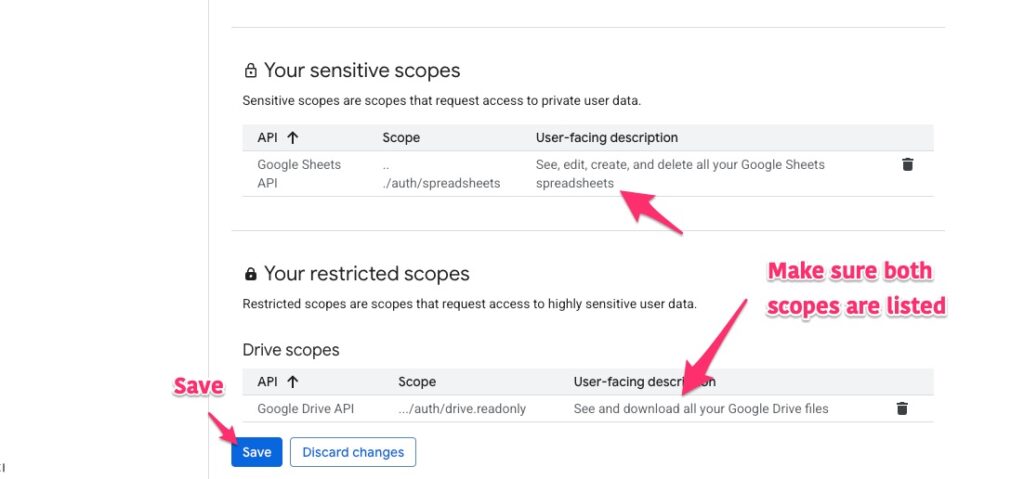
Make sure that both scopes are listed. Then click the Save button.
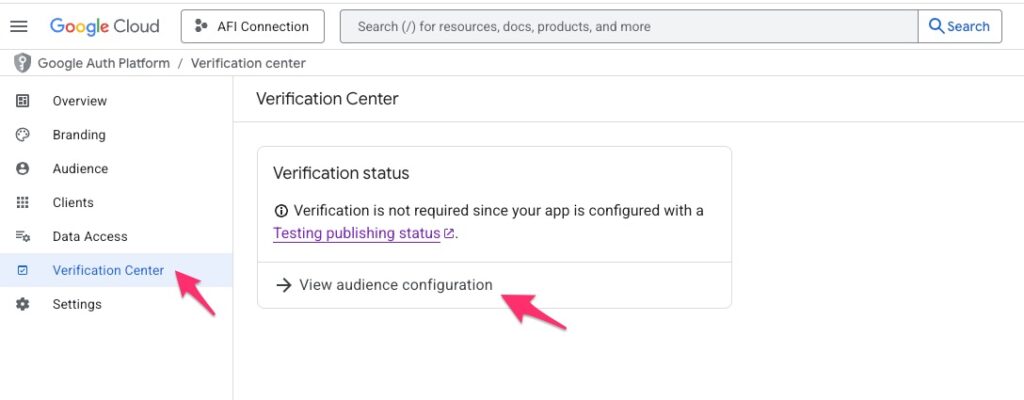
Go to Verification Center menu and click View audience configuration.
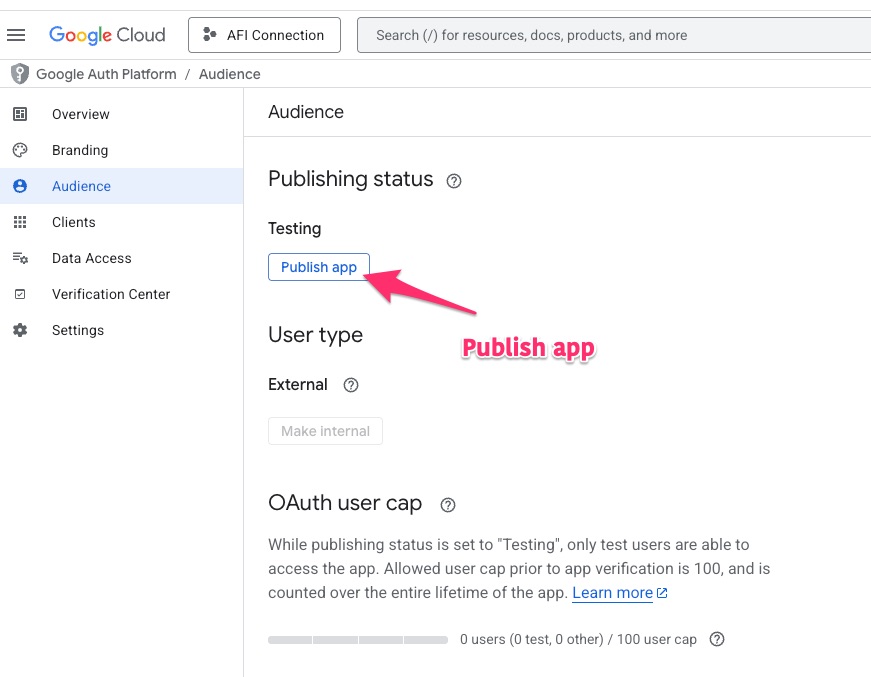
Click on the Publish app button.
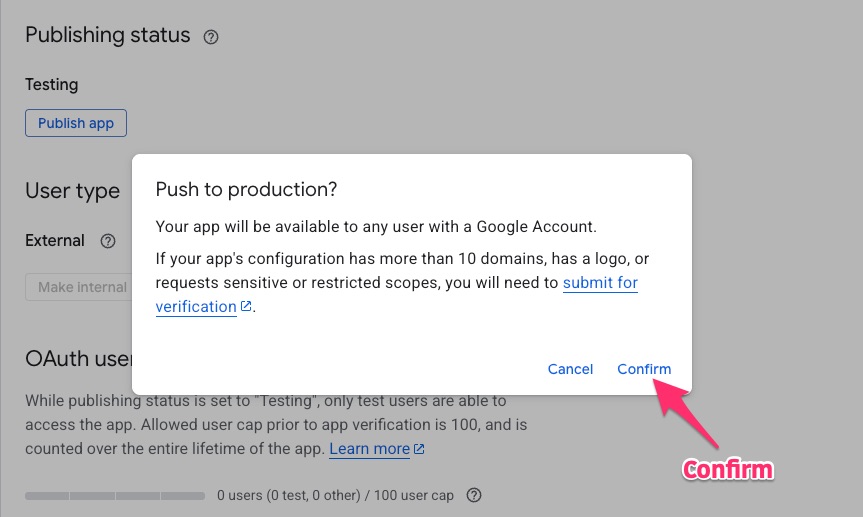
Confirm it.
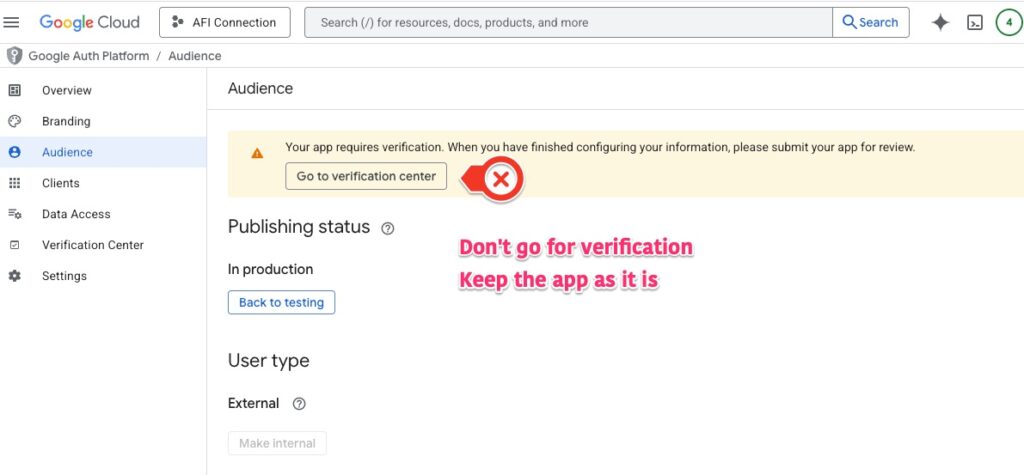
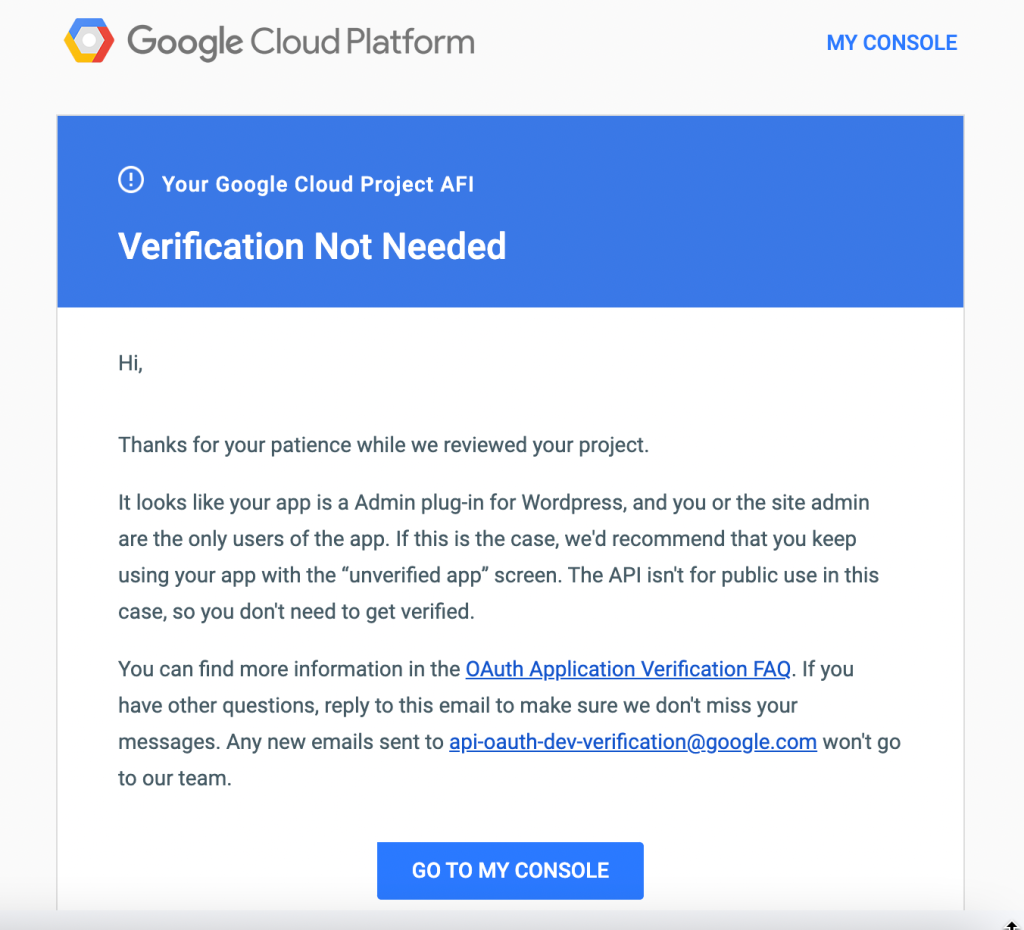
Do not go to verification center. It is not needed for our purpose.
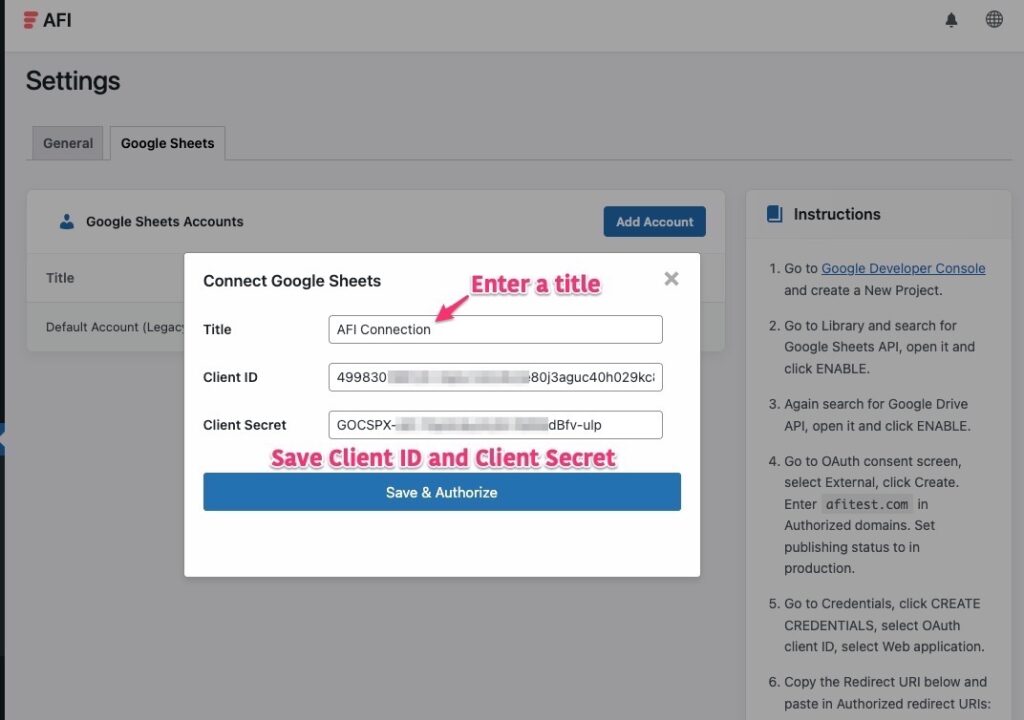
In AFI > Settings > Google Sheets, click on the Add Account button. Enter the Client ID and Client Secret. Click Save & Authorize.
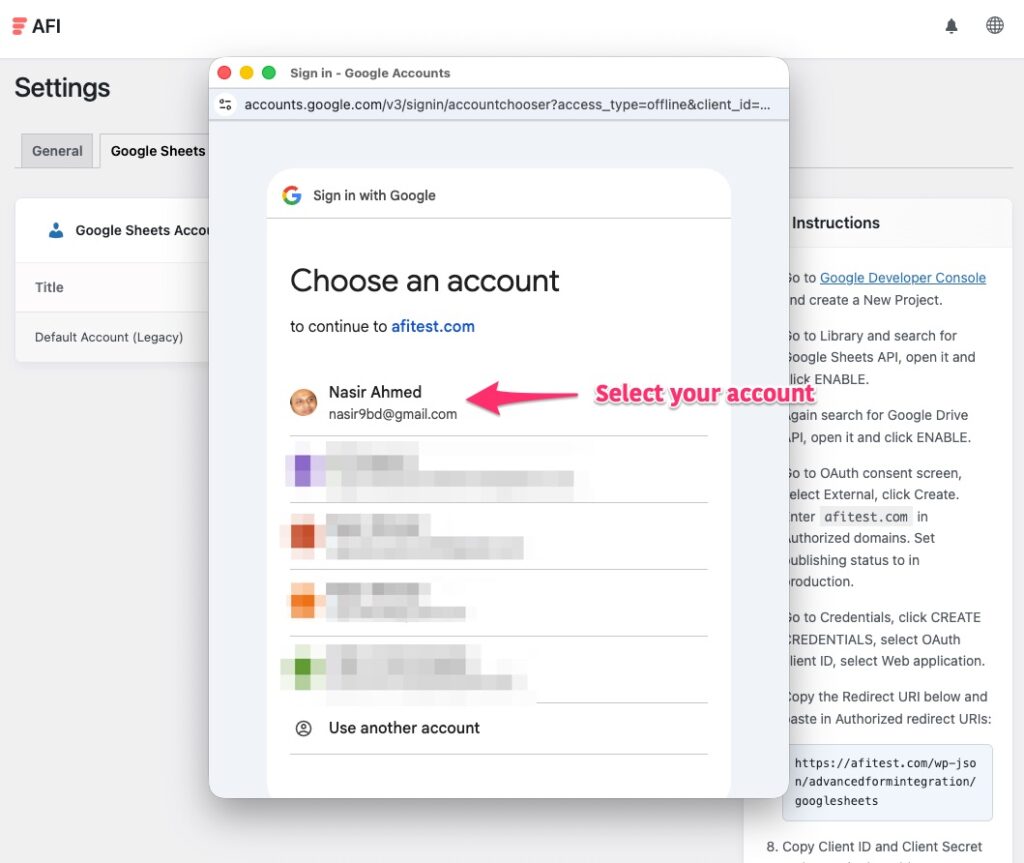
Select the Google account you want to integrate.
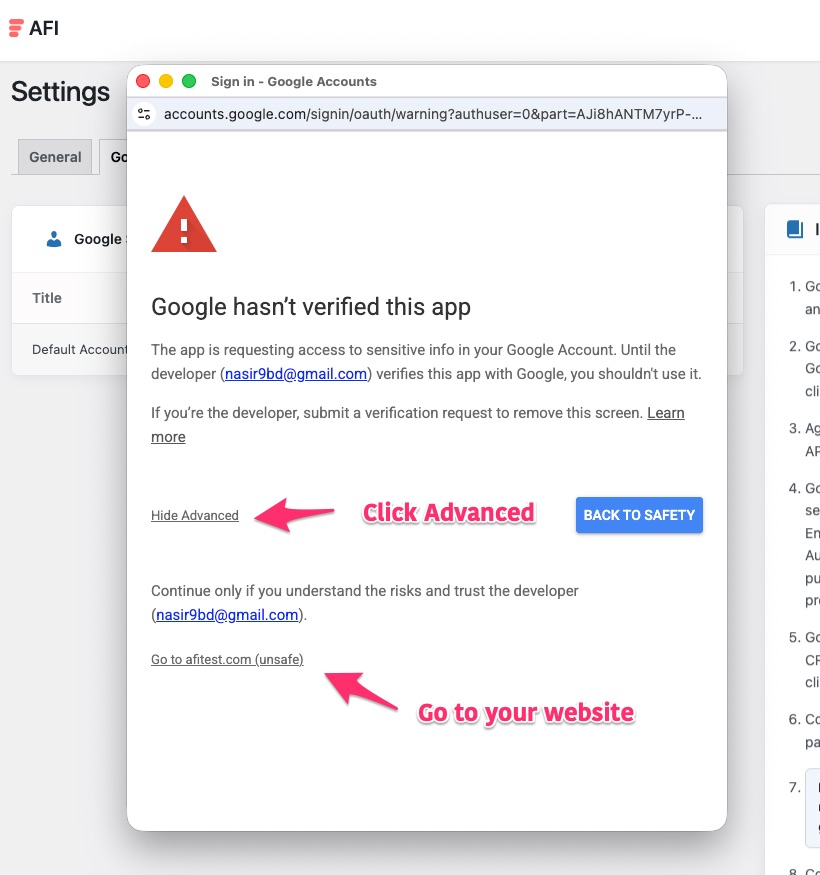
An unverified screen will pop up. Click Advanced and Go to your website.
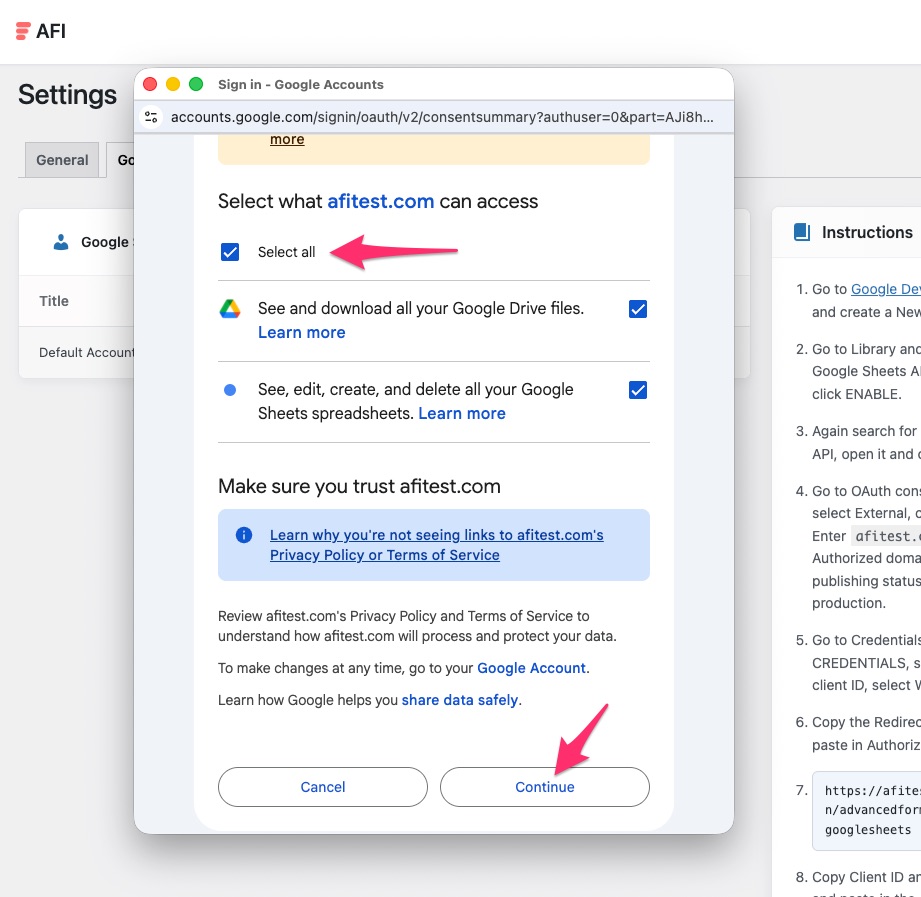
Mark Select all and click the Continue button.
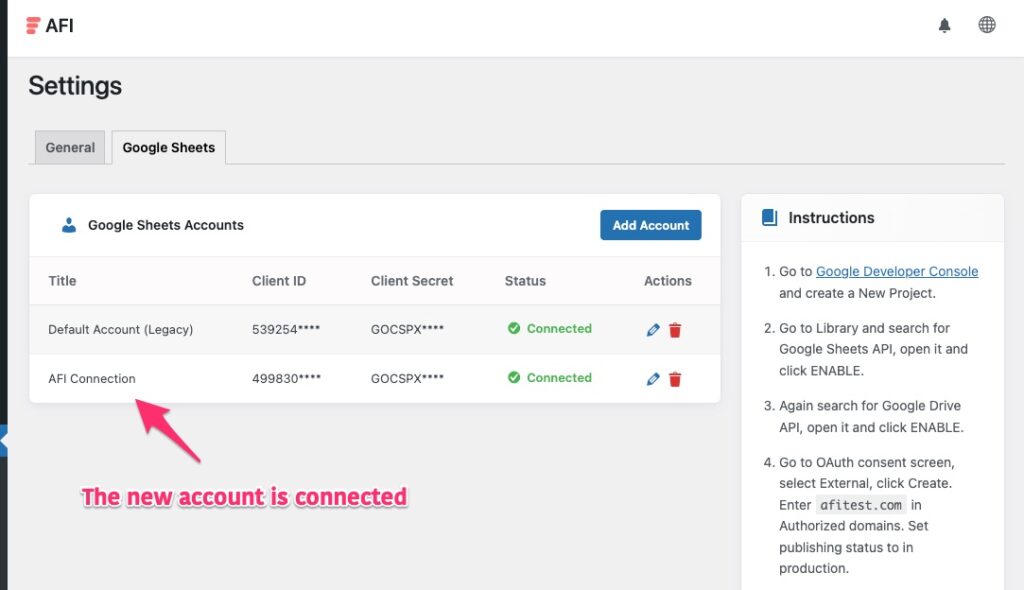
The App should now show as Connected.
Unverified App
In the process of creating the app and while authorizing, you might get an unverified app warning and the system will ask you to verify the app. Usually, if using sensitive scopes, a public app is required to go through a Google verification process, when the app is intended to be used by many people. But for AFI, it is an admin plugin and you (admin) are the only user of your own app. In this case, Google support suggested to keep using it with the unverified screen. So you can just skip the verification process and use it as it is.
Here is a video tutorial that can help you to understand:
Creating a New Integration
Here below a brief description on how easily you can start an integration.
- At first, make sure that the authorisation is done and the status is showing connected in the settings page.
- Click on Add New menu and setup the trigger platform.
- A default title will be auto-filled in the Integration Title input box. You can change it to something relevant.
- In Trigger > Form/Data Provider select your form plugin (e.g. Contact Form 7).
- The Form/Task Name dropdown will show a list of form names. Select the form you want to connect.
- In Action > Platform dropdown, select Google Sheets. If you don’t see the platform, go to plugin settings page and activate it.
- In Task, select Add New Row. New section will appear where you can select the spreadsheet, worksheet name and map fields.
- Conditional Logic can be applied if required.
- Click on Save Integration button and you are done.
Spreadsheet
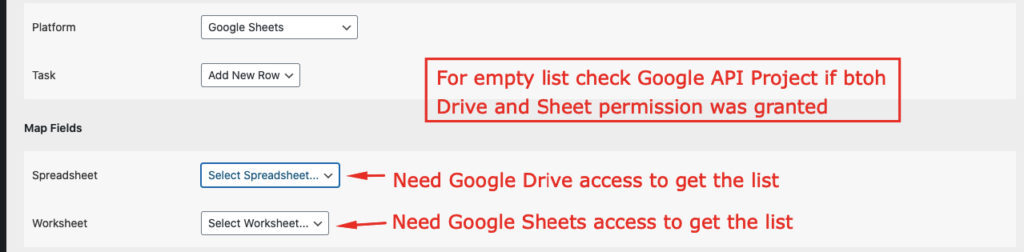
Select the correct sheet name from the dropdown. All spreadsheets from your Google account (including shared drives) will be listed.
Worksheet
You may have several tabs in the sheet. All names will be automatically populated in the dropdown. Select the correct one.
Map Fields
After selecting the worksheet/tab, all table column headers will appear and you will be able to map correct fields. Please note that table titles must be in the first row of the sheet. Otherwise the AFI plugin can’t recognize the titles.
Cell Format
Choose how values are written to cells:
- Automatic: Google parses numbers, dates, and formulas from the input.
- Automatic + strip HTML: same as Automatic but strips HTML tags from values.
- Raw: stores values exactly as submitted (preserves leading zeros, phone numbers, and values starting with + or =).
Options
- Always add to next empty row at the bottom: writes strictly below the last filled row. Use this if new rows overwrite an existing row or land in a gap under the header.
- Create the worksheet automatically if it does not exist: recreates the selected tab if it was renamed or deleted in the sheet.
Pro features
Google Sheets [PRO] adds row update, upsert, and delete capabilities, plus WooCommerce order item row expansion.
| Feature | Free | Pro |
|---|---|---|
| Add new row | ✅ | ✅ |
| Header-based field mapping | ✅ | ✅ |
| Cell format selection | ✅ | ✅ |
| Bottom-append mode | ✅ | ✅ |
| Auto-create missing worksheet | ✅ | ✅ |
| Update existing row | No | ✅ |
| Upsert (update or add) | No | ✅ |
| Delete row | No | ✅ |
| WooCommerce order item rows | No | ✅ |
Common Problems and Solutions
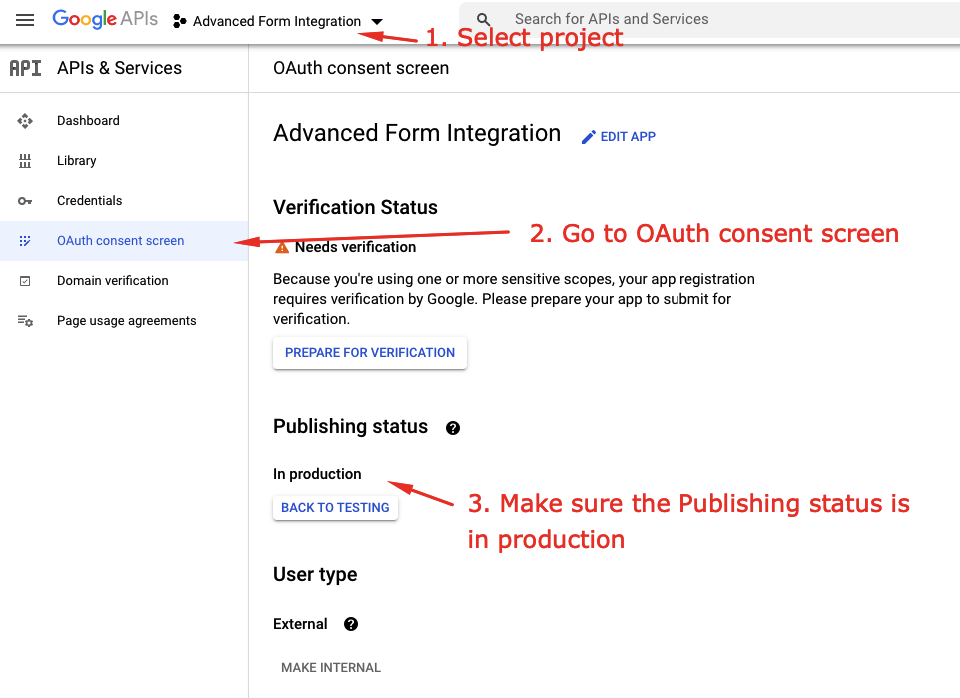
Error 403: access_denied
“The developer hasn’t given you access to this app. It’s currently being tested and it hasn’t been verified by Google.”
Go to Google API projects, and select the project from the upper dropdown menu. Then go to the OAuth consent screen menu. Check Publishing status. If it is on testing, click the button PUBLISH APP.
Empty Spreadsheet or Worksheet dropdown
Two types of accesses are needed for full operation. Google Drive API access is needed to read and populate the spreadsheet list. And Google Sheets API access for getting the details of a sheet, like tabs list. So check your Google API project library that both Google Drive API & Google Sheets API were enabled and scopes added.
After I click the Save & Authorize button, the page just reloads and nothing happens
Please go to the Google App Permissions page and look for a previous authorization for this app and click on REMOVE ACCESS. Then try authorizing again.
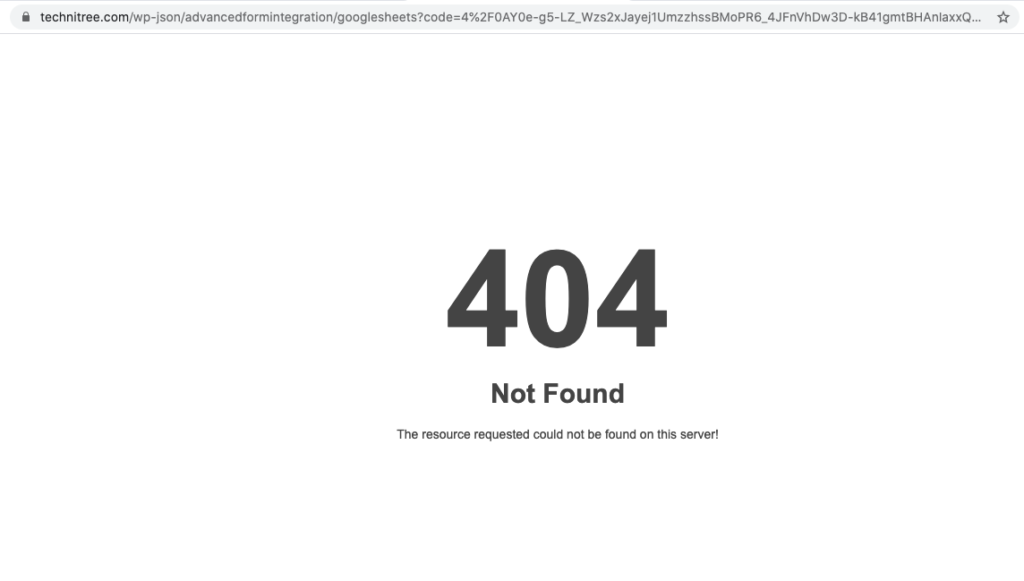
After I click the Save & Authorize button, getting a 404 page
Go to WordPress admin > Settings > Permalinks. Now select Post name and save the changes. Try authorizing again.
Is there any usage limit?
The plugin itself doesn’t impose any limit. However, Google Sheets API has limits like a maximum of 500 requests per 100 seconds. Please check the Google Sheets Usage Limit page for more details.
Data added to wrong column
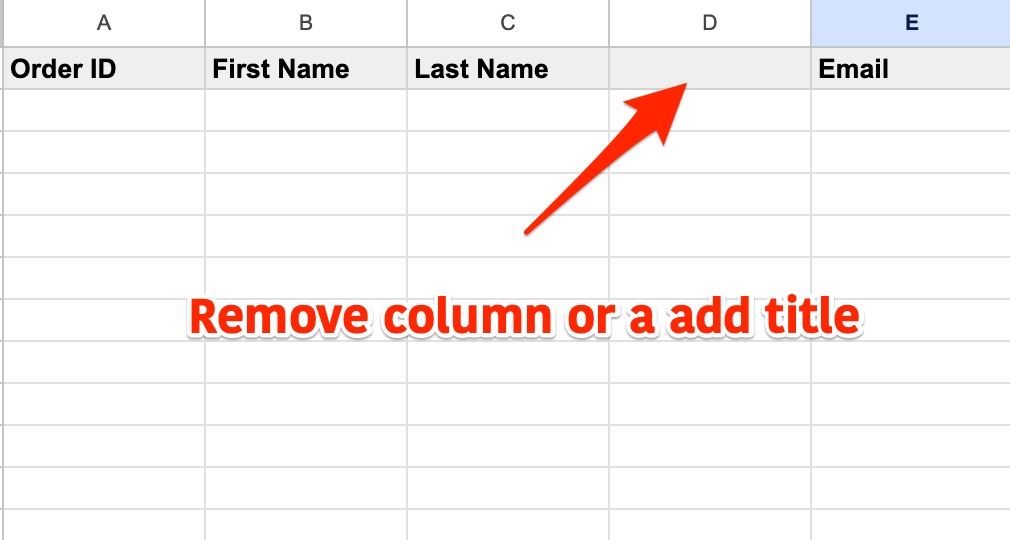
Column shifting occurs when there are columns in the table without titles. To fix this, either remove those columns or give them titles. After that, visit the integration page and adjust the field mappings. If you prefer not to send data to those columns, you can leave them blank in the integration settings, but make sure they still have titles.
Common issues and fixes
Google Sheets is one of our most-asked-about receivers. Most “stopped working” reports trace back to one of these four fixes:
- Re-authorize. If OAuth grant expires for any reason, go to AFI > Settings > Google Sheets, scroll to the bottom, click Reconnect. Resolves the majority of “stopped working” cases.
- Enable the Drive scope. If spreadsheets aren’t showing in the dropdown after Connected, add
https://www.googleapis.com/auth/driveto the OAuth consent screen in Google Cloud Console, then re-authorize. - Set permalinks to Post name. Go to Settings > Permalinks, pick Post name, save, then re-authorize. This lets the OAuth callback complete.
- Remove blank header columns. Open the sheet and clear any empty header cells in row 1. This is the #1 cause of data landing in the wrong column.