Elementor Pro Form
Overview
Elementor has gained much popularity in recent years. Elementor Pro has built-in contact form widget in it. The AFI plugin can integrate this Elementor Form into many other platforms.
The functionality of Elementor Pro Form is different from other WordPress forms. While conventional forms are created and designed in their own menu and then displayed on the front end using a shortcode, Elementor Pro Form is created directly on a page, post, or template.
There are three different methods to integrate Elementor Pro Form using the AFI plugin.
First Method
This method is commonly used and works in the same way as the AFI plugin’s connection to other platforms. You simply select the sender form, choose the receiver platform, map the fields, and your integration is complete. Let’s explore how effortless it is to create this integration.
Get the Page or Post ID and Form Name
Go to the page on your website where the form exists. Click on Edit with Elementor . You will see the Post ID on the URL. Select the Form and you will find the Form Name on the left pane. Remember both Post ID and the Form Name.
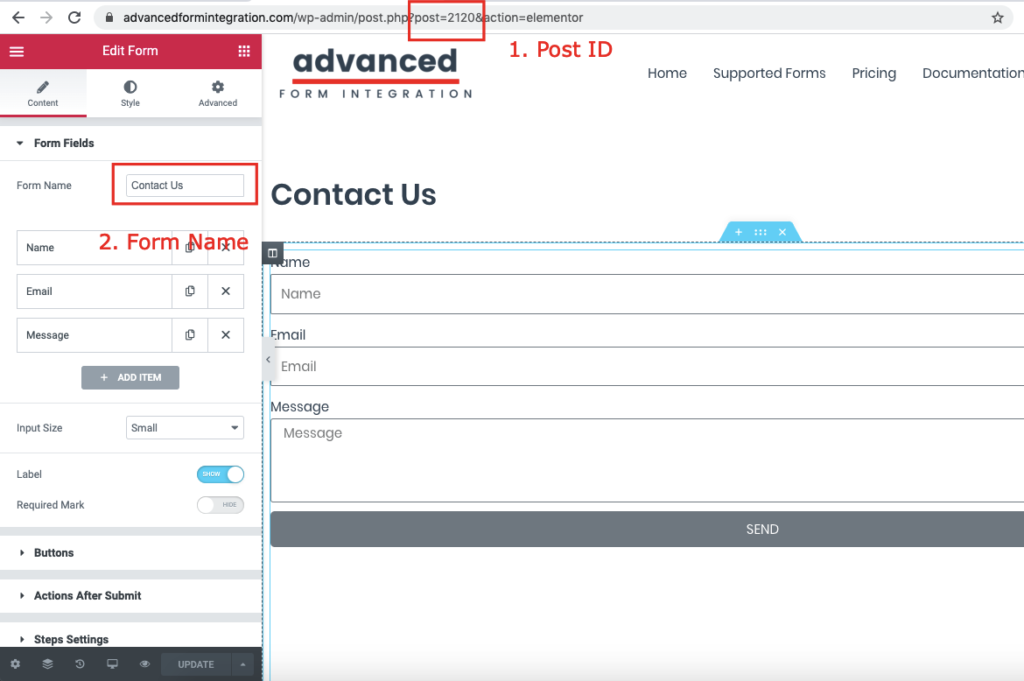
On the above example screenshot the Post ID is 2120 and the Form Name is Contact Us.
Select the same Post ID and Form Name
Now create a new integration and select the same Post ID and Form Name as sender platform. Follow the steps below:
- Go to [direction] WordPress Admin > AFI Menu > Add New [/direction].
- A default title will be auto-filled in the Integration Title input box. You can change it to something relevant.
- In [direction]Trigger > Form/Data Provider[/direction] select Elementor Pro Form.
- The [direction]Form/Task Name[/direction] dropdown will show a list of all the Elementor Forms that were created in different pages of the website. Items will be named in post_id form_name format. The name for the form on the above example screenshot will be 2120 Contact Us. We need to select it.
- In [direction]Action > Platform[/direction] dropdown, select the platform name to where you want to send the data. If you don’t see the platform, go to plugin settings page and activate it. Complete the fields mapping. It can be different for different platforms. Please check out the Receiver Platforms documentation page.
- Conditional Logic can be applied if required.
- Click on Save Integration button and you are done.
Now fill the form with test data and submit, it should be sent to the receiver platform that was configured. If you don’t see the new data in the receiver platform, check the [direction]AFI > Log[/direction] menu if any error was listed.
Form as a GLOBAL widget
When a form is added as a GLOBAL widget, a single form is shared on different pages. In this case, you may not see the actual Post ID to select in the Form/Data Provider dropdown. Select the original Post ID+Form Name and complete integration. Then go to the form settings and add the integration ID as shown in the second method below.
Supported Form Fields
Here is the list of supported form fields in Elementor Pro Form that can be sent over to other platforms:
| Field | Output |
|---|---|
| Text | Same as input |
| Same as input | |
| Textarea | Same as input |
| URL | Same as input |
| Tel | Same as input |
| Radio | Same as input |
| Select | Same as input |
| Checkbox | Comma-separated values |
| Acceptance | on (when selected) |
| Number | Same as input |
| Date | In YYYY-MM-DD format |
| Time | 24H format |
| File Upload | Uploaded file link, comma-separated for multiple files |
| Password | Same as input |
Second Method
The first method generally works on all cases. Still we have got a few reports that the integration is not working. So if you follow the first method but the integration is not working and there is no error log in [direction]AFI > Log[/direction] menu then you just need to perform one more step.
Get the Integration ID
Go to the integration page that you created using the first method. You will get the ID on the title. Copy it.
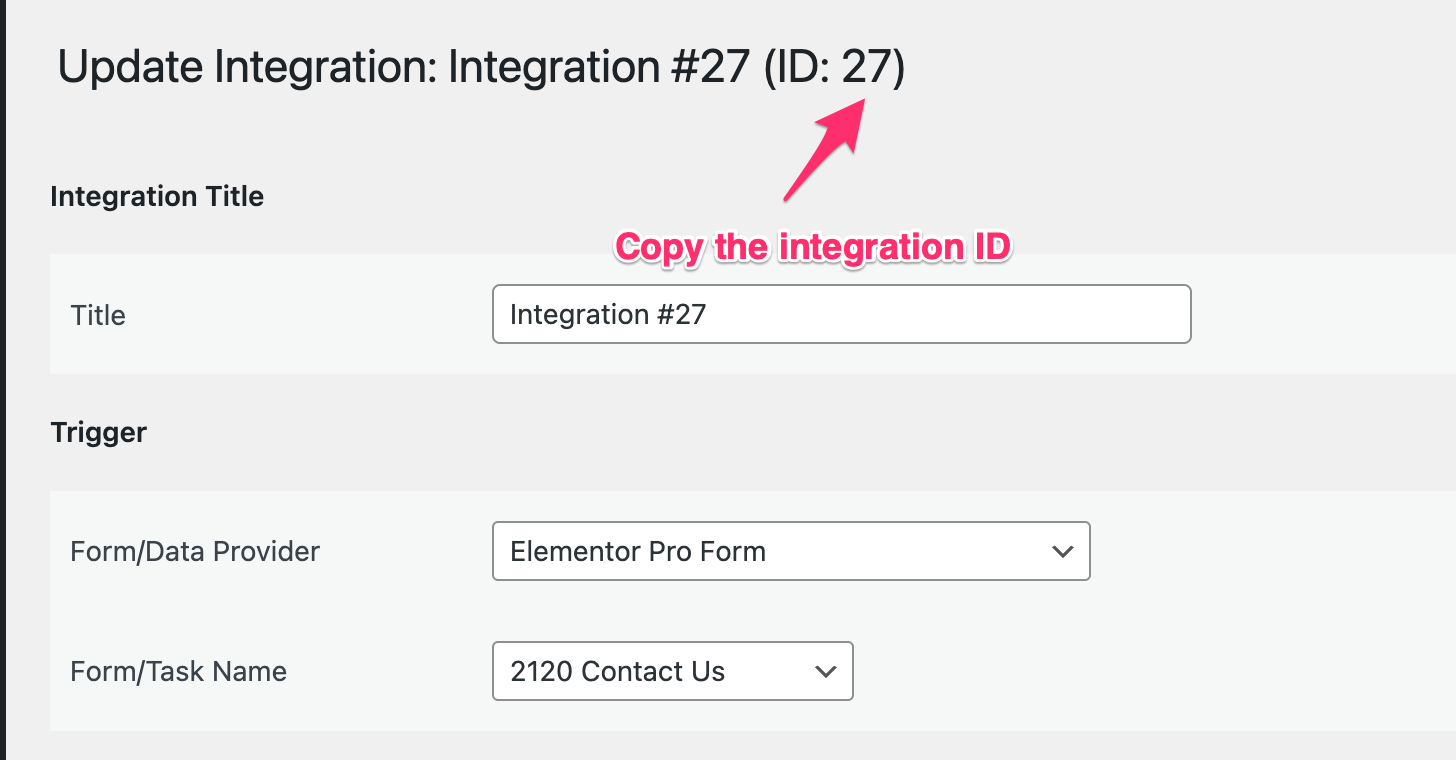
On the above example screenshot the Post ID is 2120 and the Form Name is Contact Us.
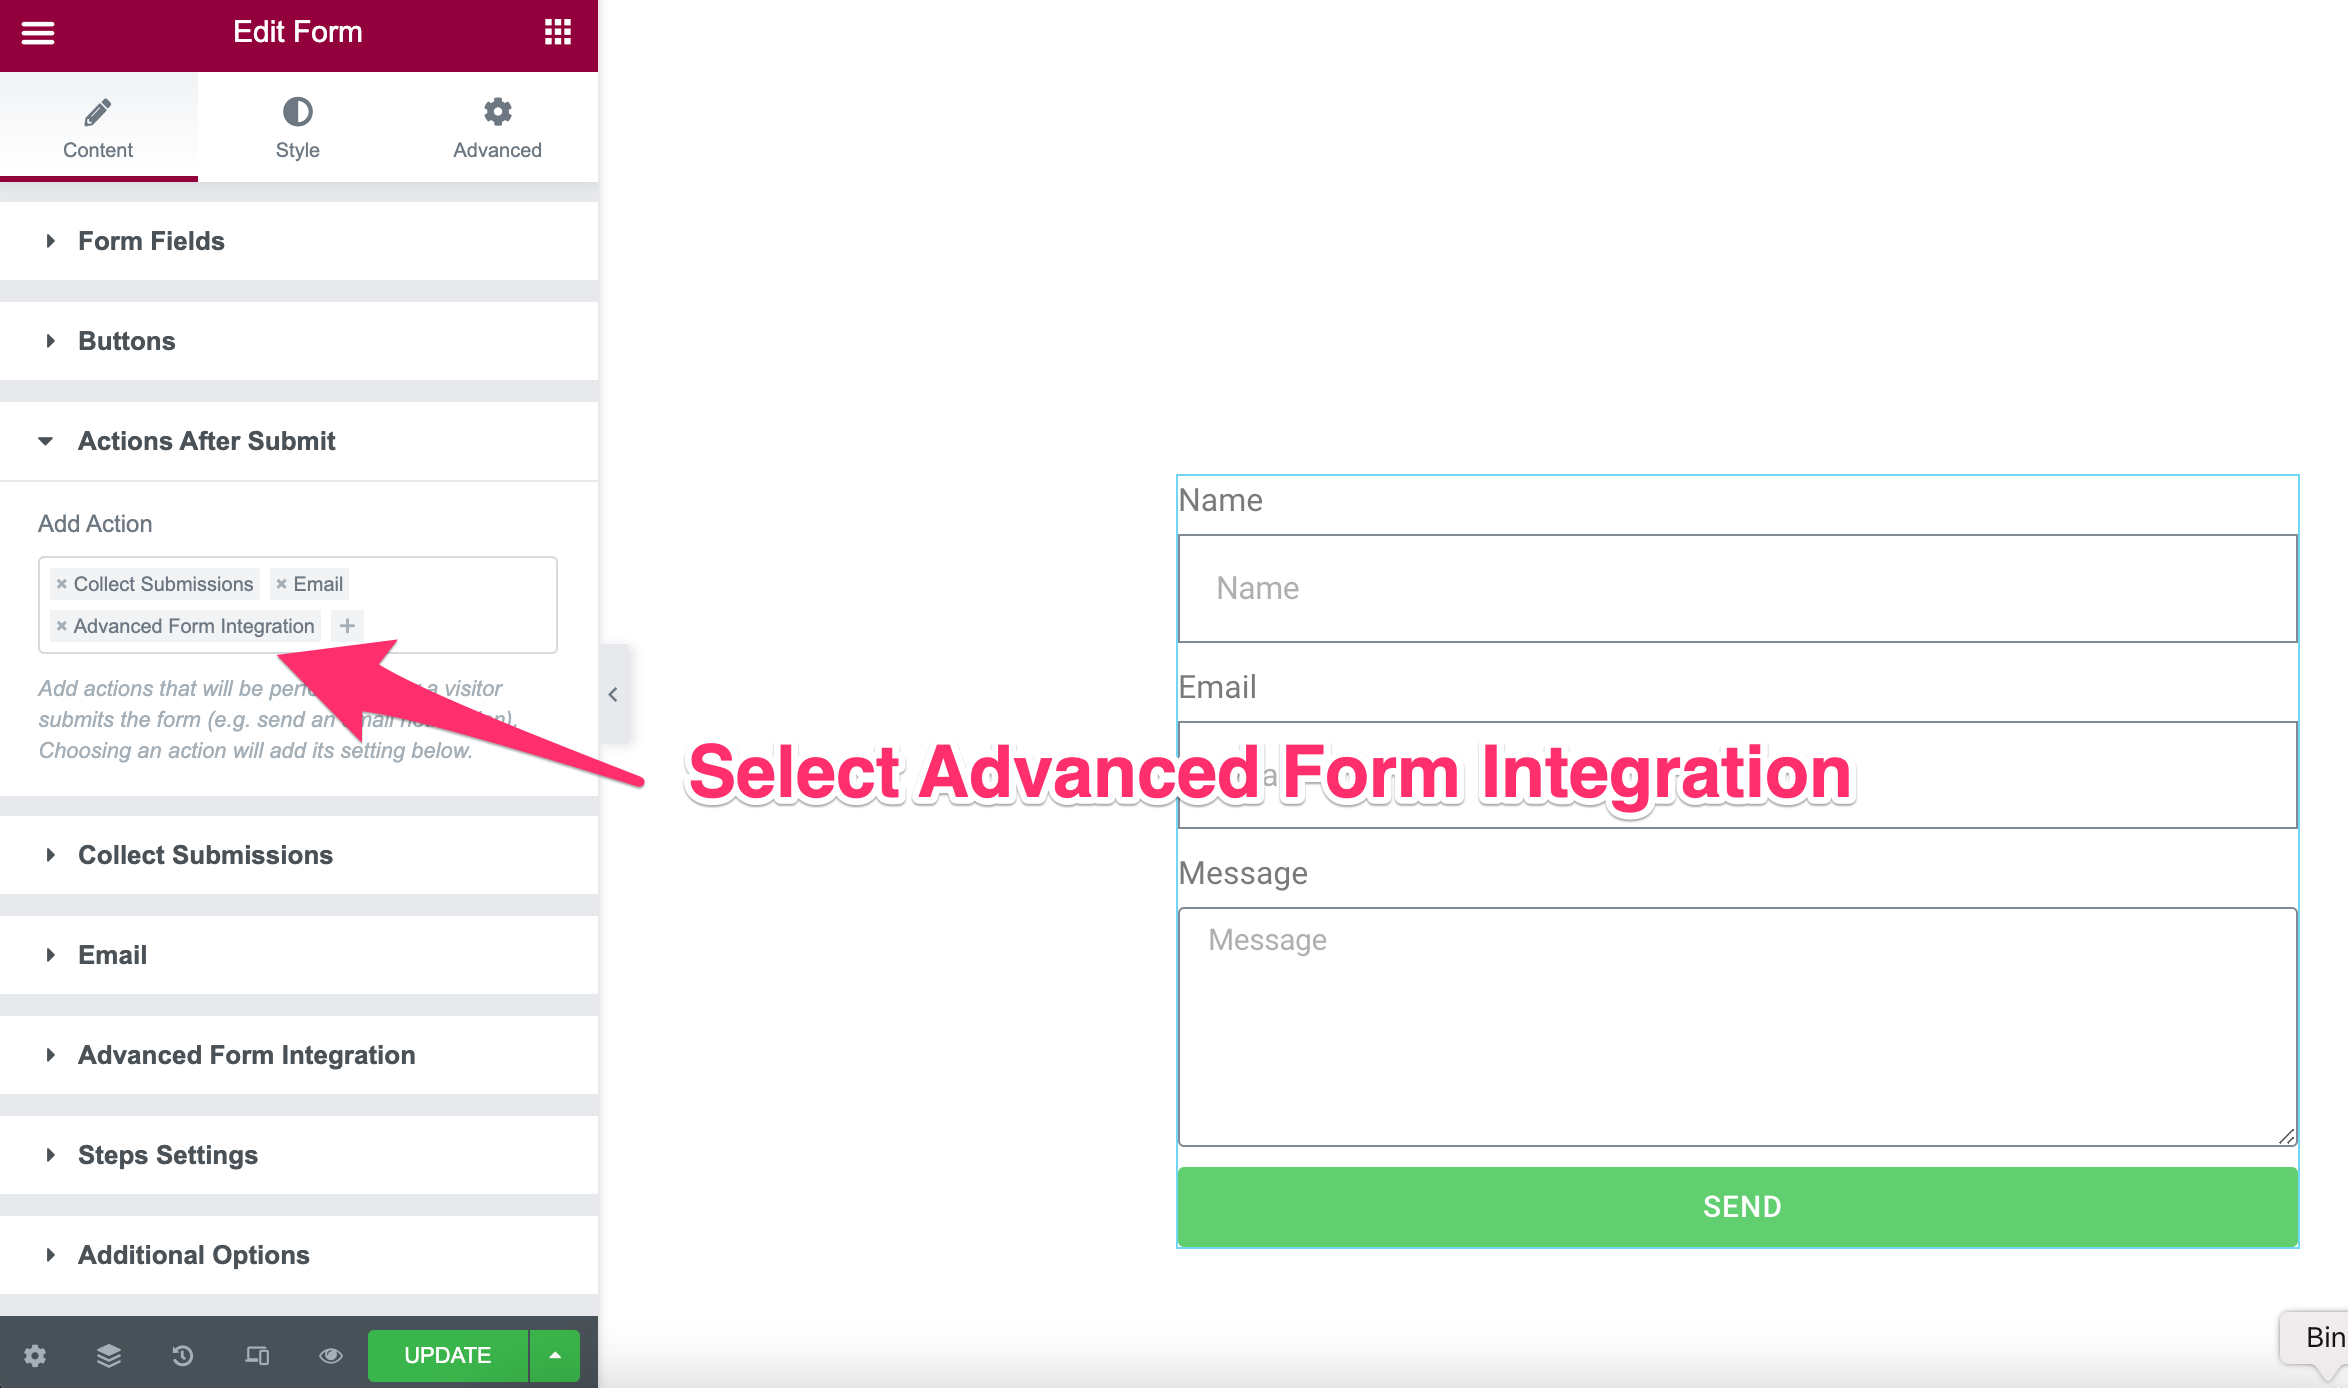
Select Advanced Form Integration in Actions After Submit
Go to the form settings, click on the Actions After Submit input box. Select Advanced Form Integration from the dropdown.
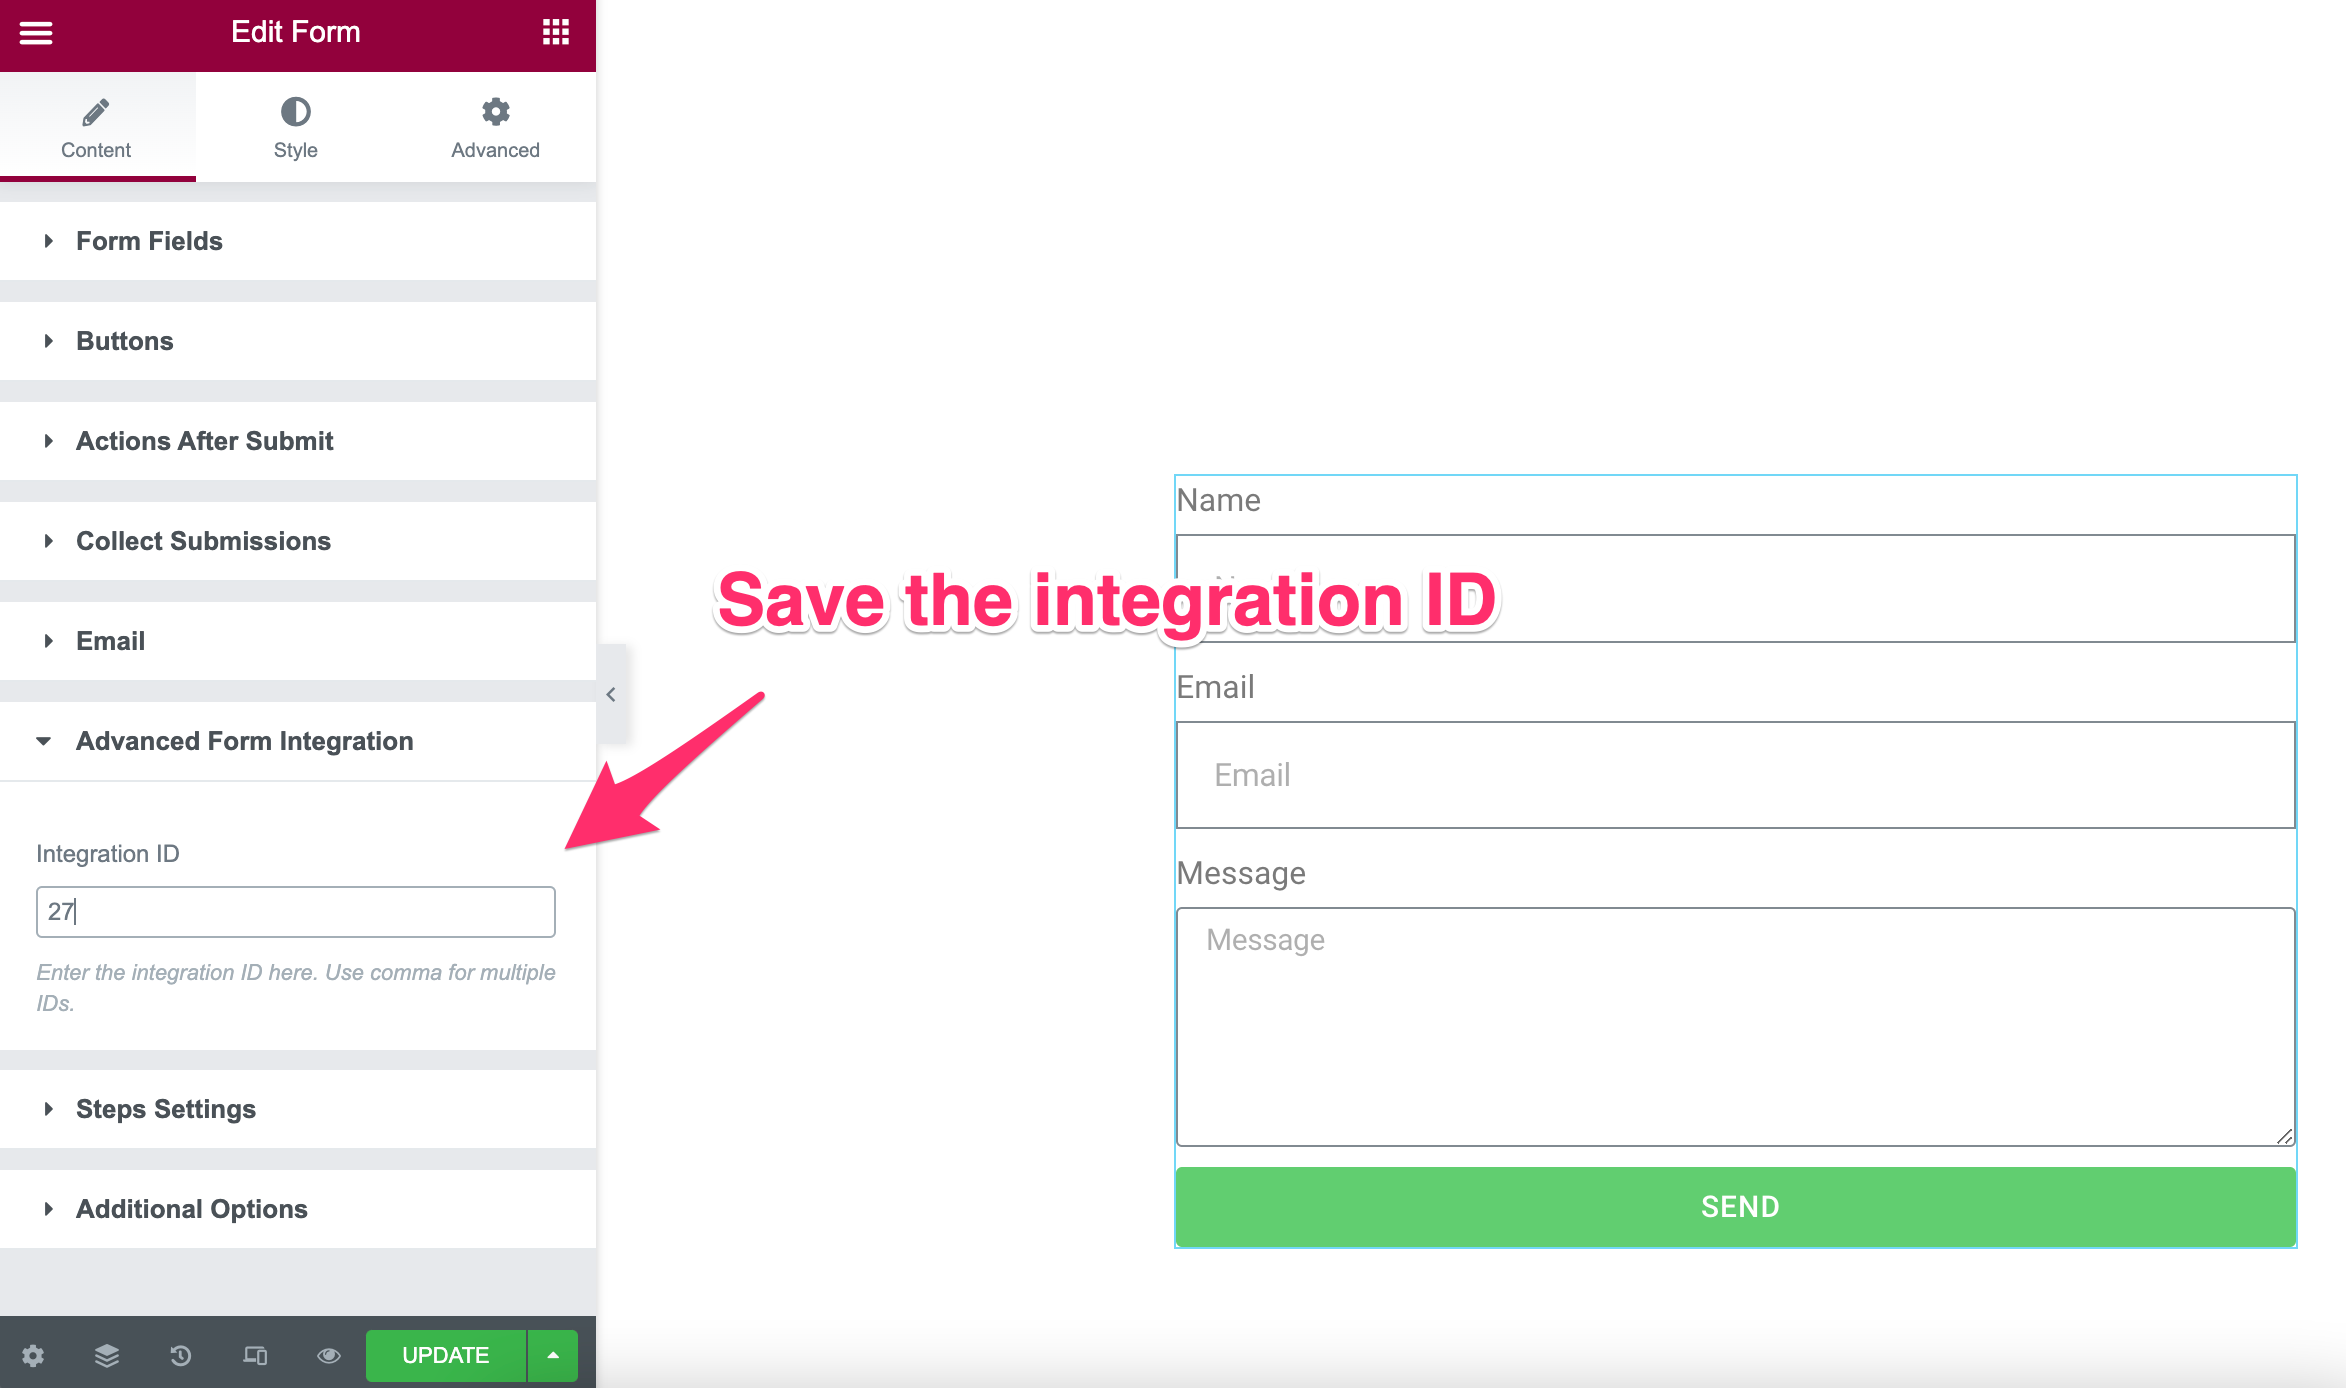
Save the Integration ID
In the Advanced Form Integration section save the integration ID. If you want to connect this same form to multiple integrations then add comma-separated IDs.
Now test the integration by filling out the form. Remember that, follow this second method only if the first method does not work. Otherwise, it may create duplicate entries as both methods will work separately.
Third Method
It is a manual method. To setup integrations in this way follow the instructions below:
https://www.youtube.com/watch?v=QQSYcKA8XLY
Select Trigger
Go to [direction] WordPress Admin > AFI Menu > Add New [/direction]. In [direction]Trigger > Form/Data Provider[/direction] select Elementor Pro Form (Manual Method) .
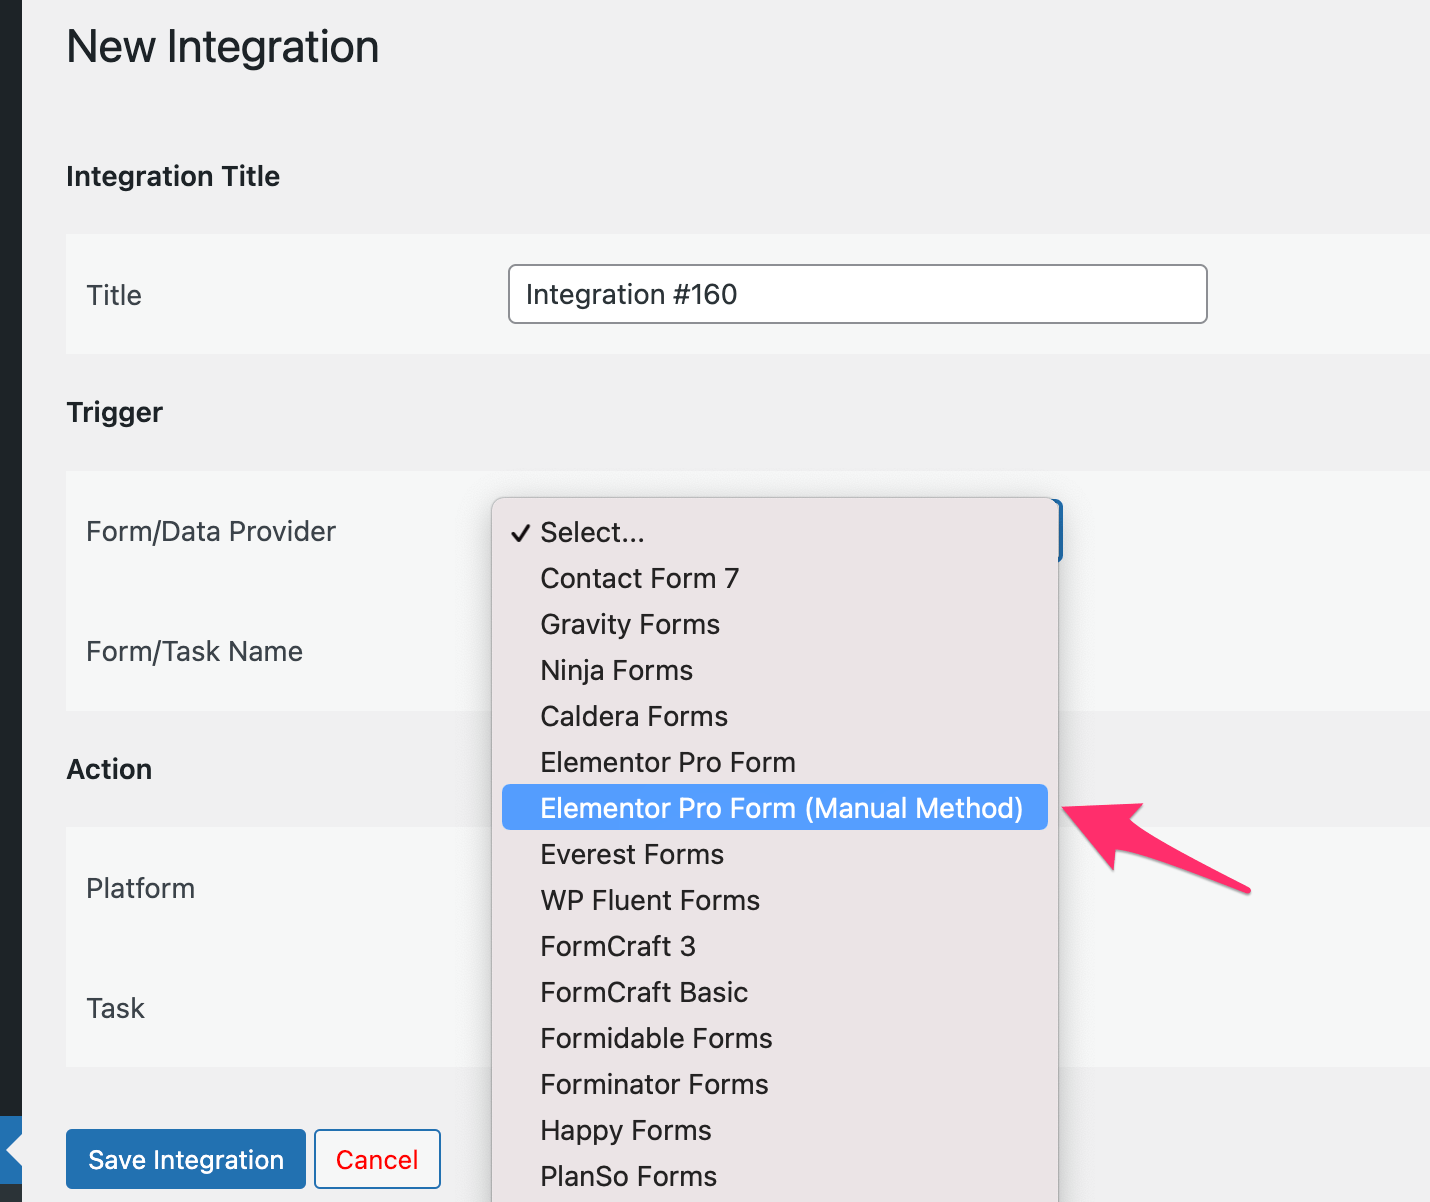
In [direction] Form/Task Name [/direction] select Manually add form field IDs.
Manually map form field IDs
In action select the receiver platform that you want to connect. While mapping the fields like name, email, phone, etc., manually copy each field ID from the form, enclose it with double curly braces and add it to the relevant input box. See the screenshots below.

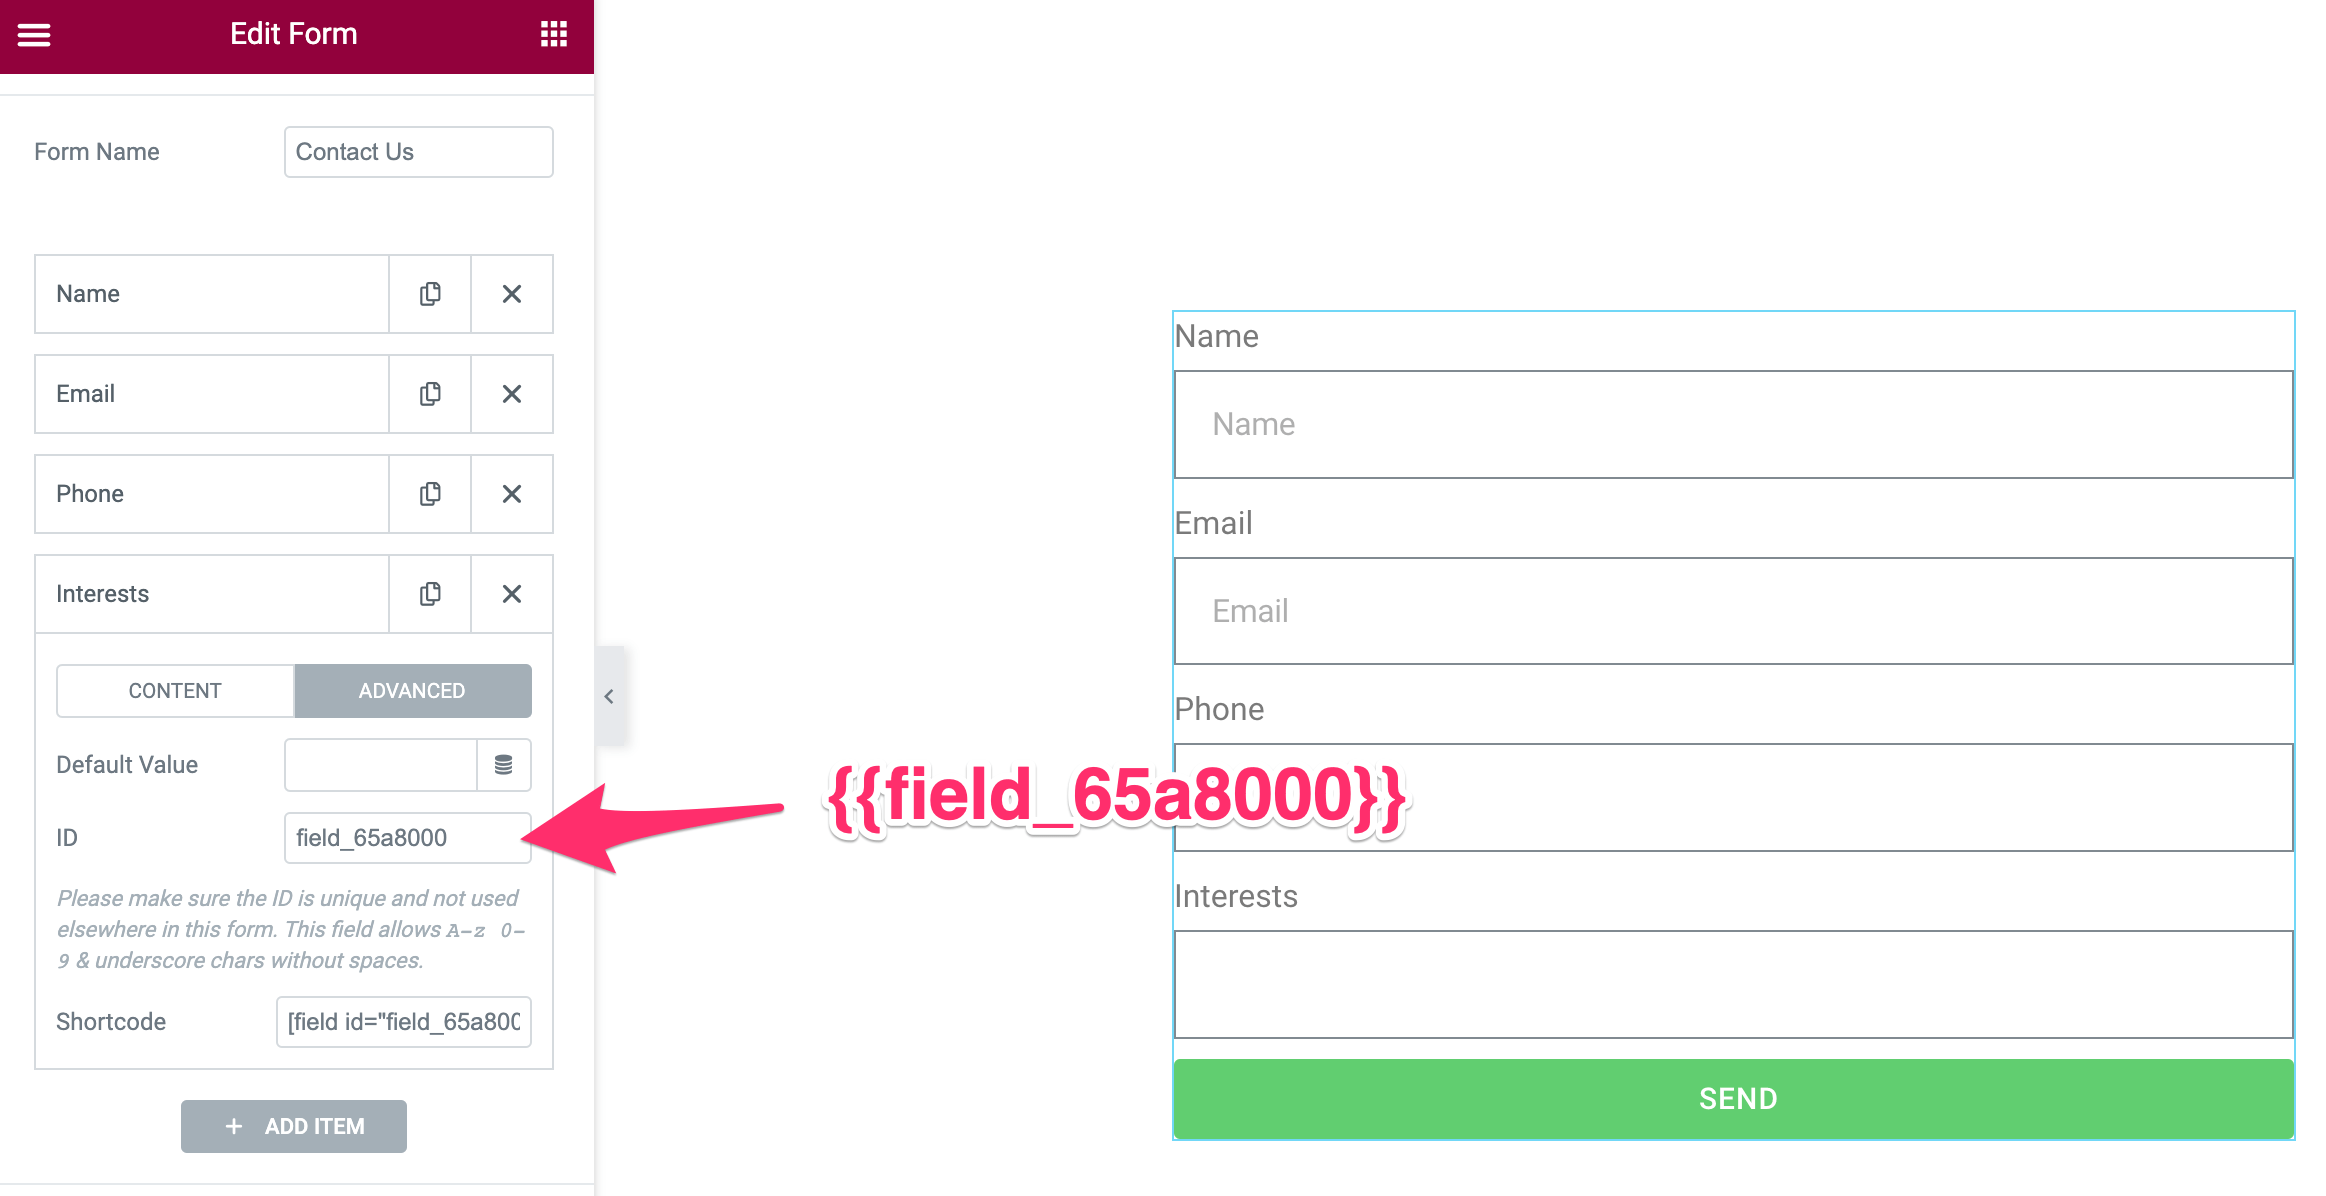
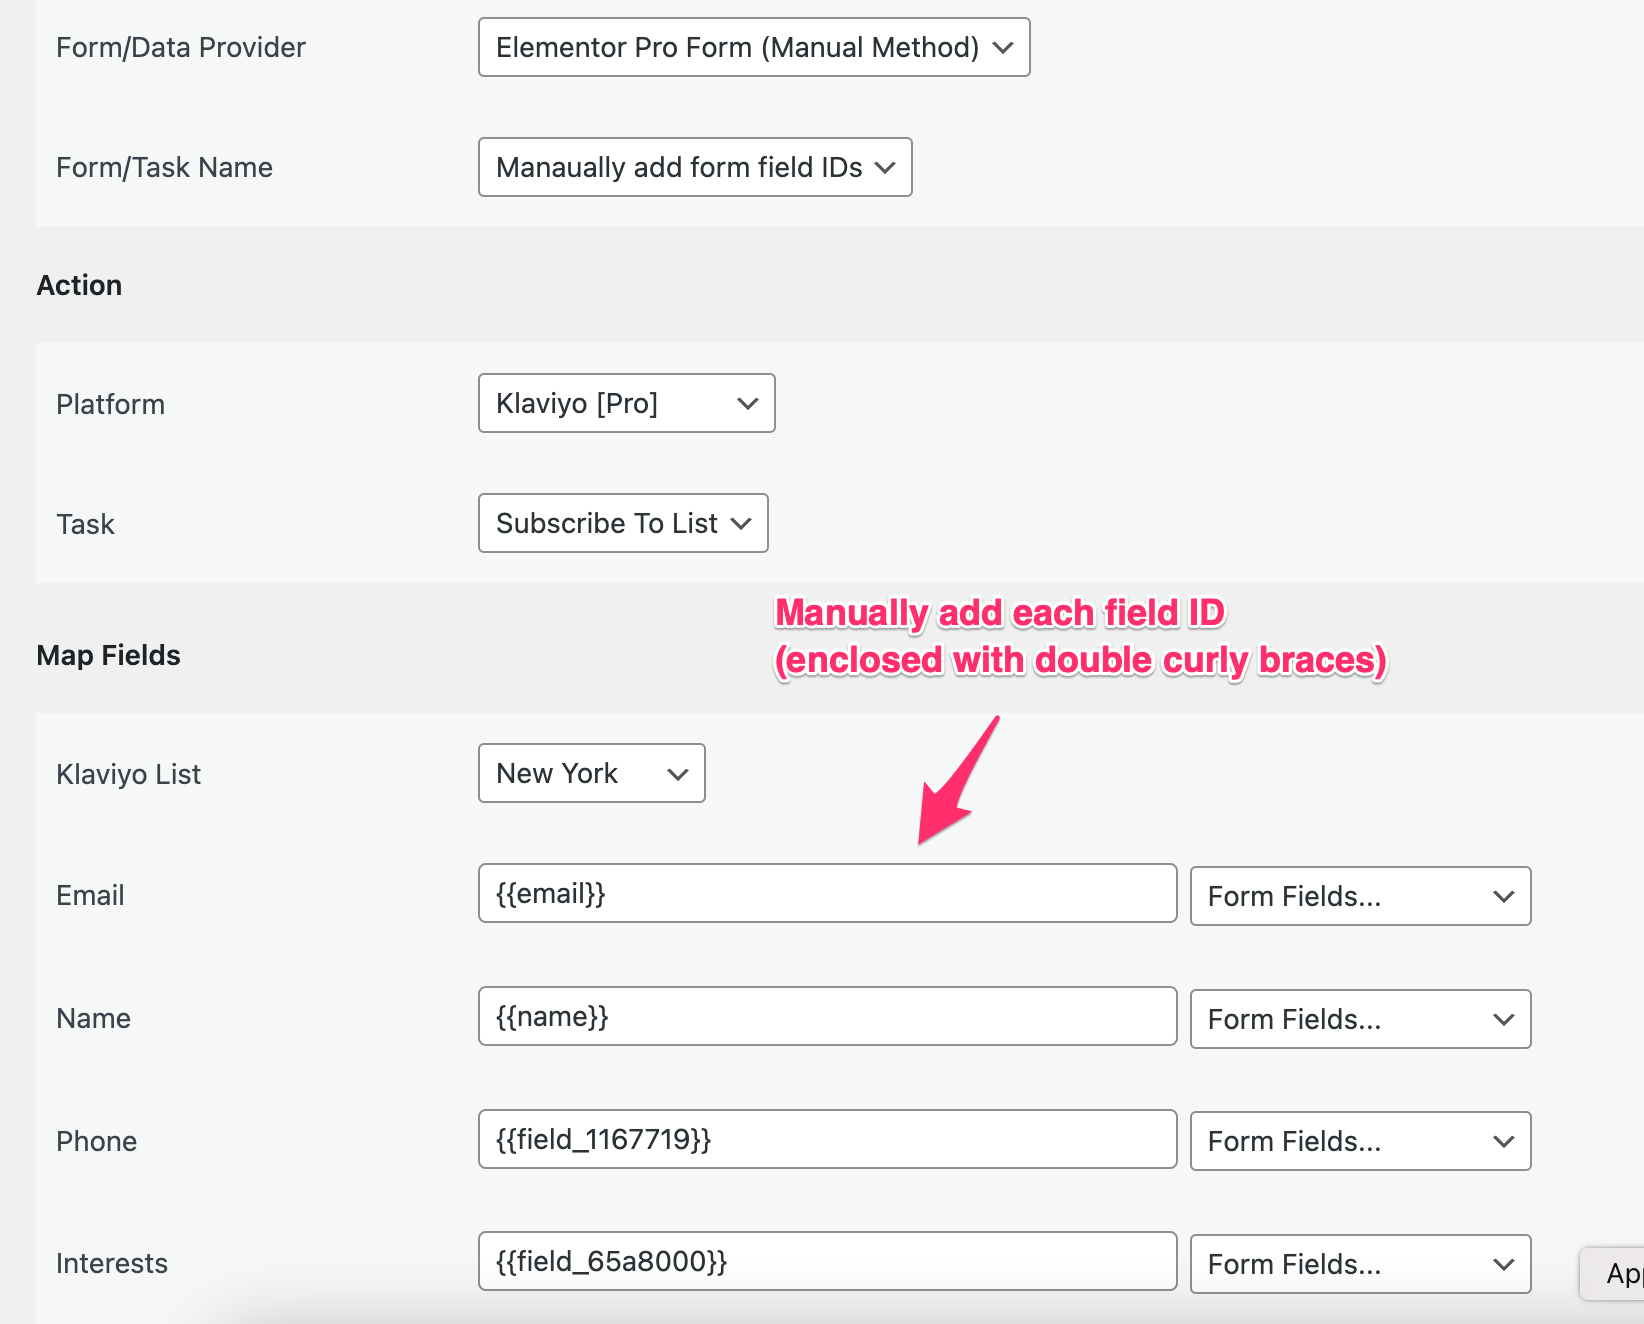
After all the required field IDs are placed, save the integration.
Save the Integration ID
Now follow the second method and save the Integration ID to form settings. The setup is complete now. Do a few tests by filling out the form.
Conditional Logic
Conditional Logic enables you to filter user-submitted data and determine which submissions to allow and which to reject. For instance, if you wish to accept only those submissions where users have agreed to the terms and conditions, you can add an acceptance field at the bottom of the form to obtain their consent. By checking the supported form fields table above, you’ll notice that the acceptance field sends the text [direction]on[/direction] when it is selected. We can use a conditional logic like the one shown in the screenshot below:
