Zoho CRM
Overview
Zoho CRM is a widely used platform known for its comprehensive customer relationship management features.
The Advanced Form Integration plugin easily integrates Zoho CRM with popular WordPress forms. When a user fills out a form on your website, the plugin will send the data directly to your Zoho CRM account, allowing you to create Accounts, Leads, Contacts, and more effortlessly.
Supported Features
- Accounts
- Leads
- Contacts
- Deals
- Tasks
- Meetings
- Calls
- Products
- Campaigns
- Vendors
- Cases
- Solution
- Tags and Custom Fields [direction]AFI Pro[/direction]
How to Setup
Using the AFI plugin is incredibly easy. Simply authorize your Zoho CRM account, establish integration, map the necessary fields, and you’re good to go.
Authentication
It requires authorizing the Zoho CRM account with the AFI plugin for integration. Follow these steps to complete the authorization:
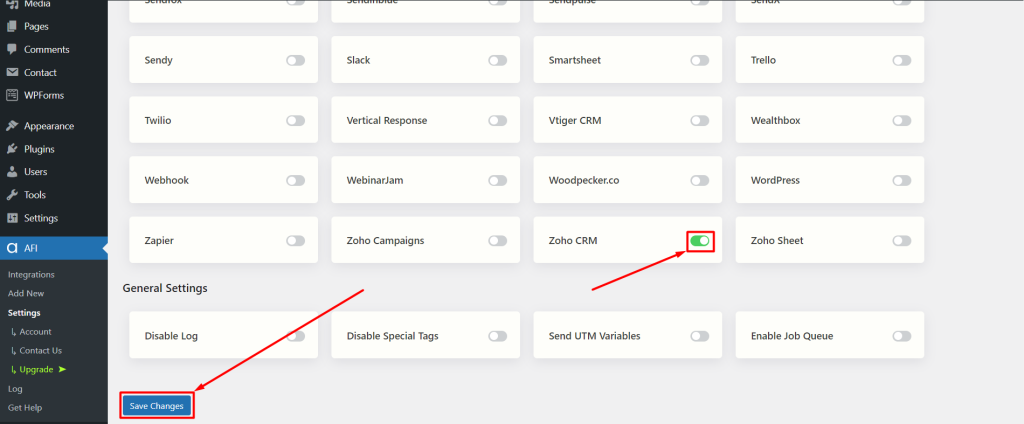
1. First go to the AFI > Settings. Find Zoho CRM. Toggle the switch to turn it on, then click the Save Changes button.
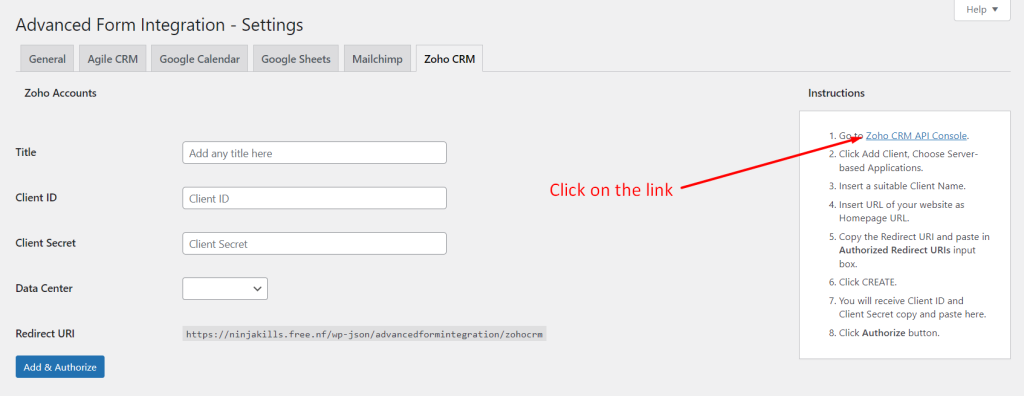
2. Scroll to the top find the Zoho CRM tab, and click on it to proceed.

3. Read the instructions about creating a simple API connection. Click on the link Zoho CRM API Console.
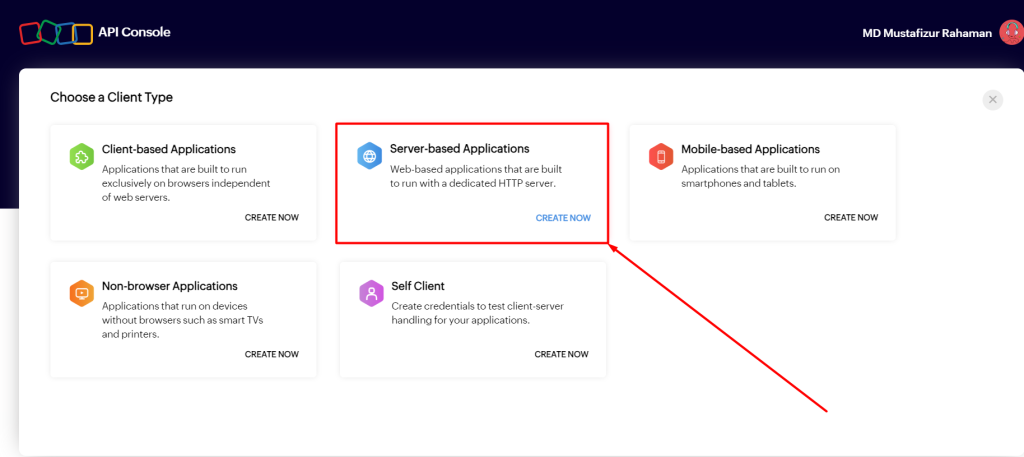
4. Clicking the link will take you to the Zoho API Console page. If you’re not already logged in, simply login to proceed. Click on Get Started, and choose Server-based Applications as the client type.
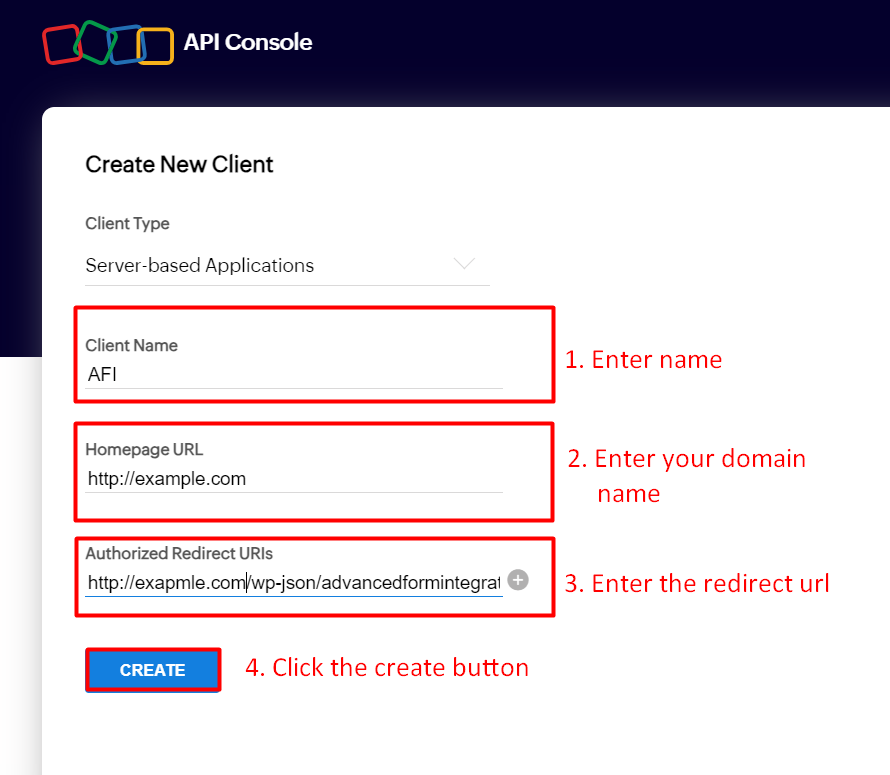
5. Enter a Client Name and your Homepage URL.
6. Copy the Redirect URL from the settings page. It usually looks like this: https://yourdomain.com/wp-json/advancedformintegration/zohocrm. And paste it into Authorized Redirect URIs. Then click the Create button.
7. The newly created app will generate the Client ID and Client Secret.
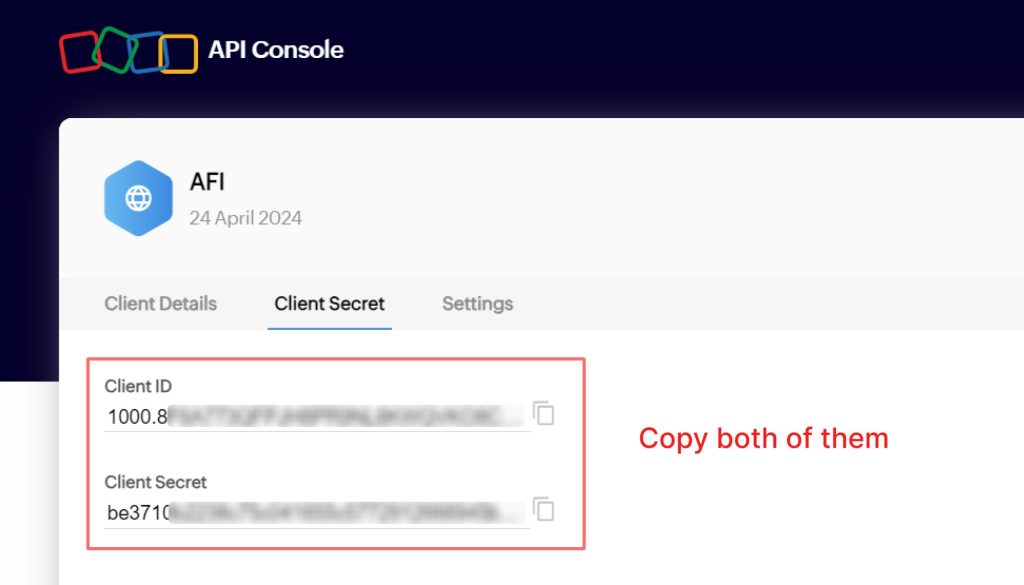
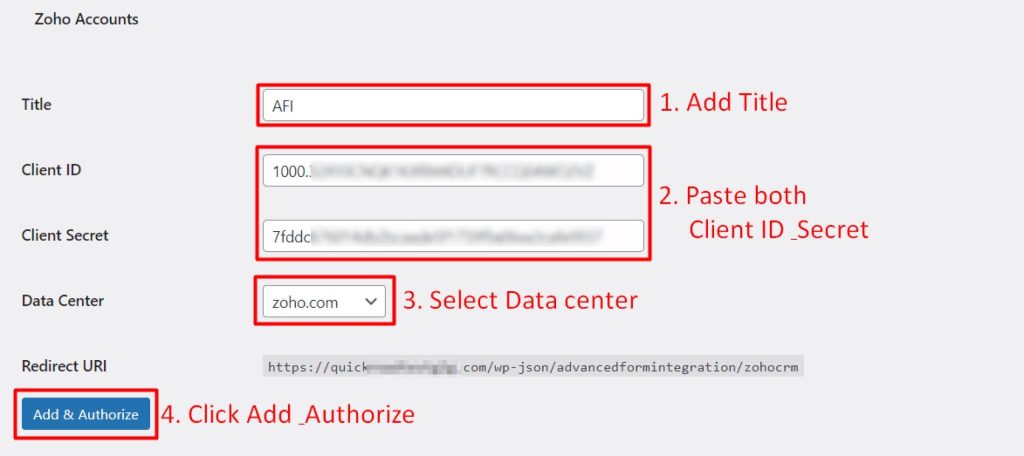
8. Copy both of the generated Client ID & Client Secret and paste them into the respective fields in the settings. Also, include a title and select Data Center (e.g. zoho.com, depending on what was regionally allocated). Then click the Add & Authorized button.
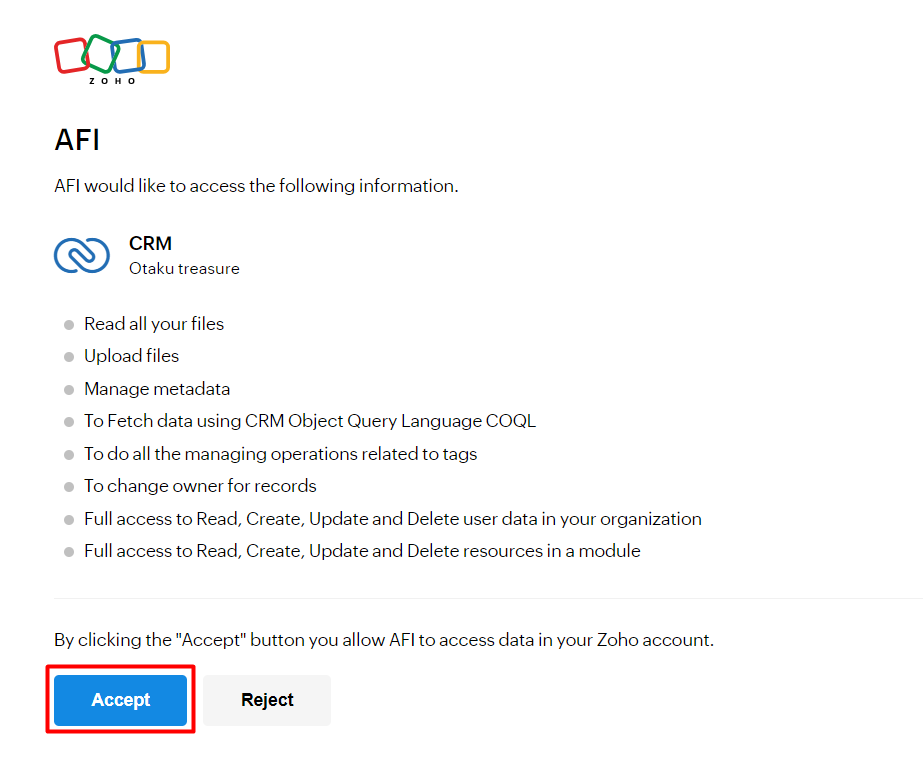
9. The consent page will open. Click the Accept button.
10. An account connection will be created with the status Connected. it is possible to add multiple accounts.

The authentication is complete, and you can start building integrations.
Create New Integration
To create a new integration, take the following actions:
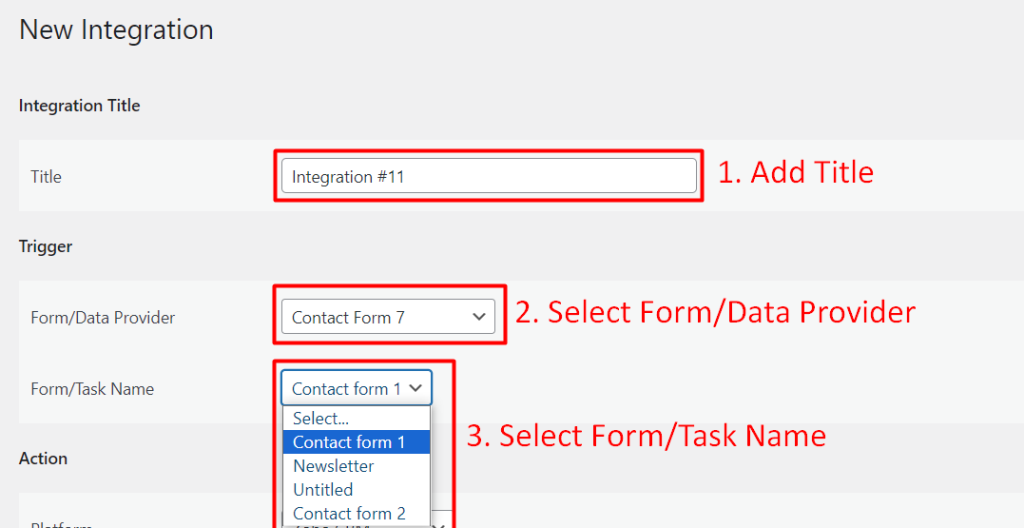
1. Select Add New under the AFI menu, and the New Integration page will appear.
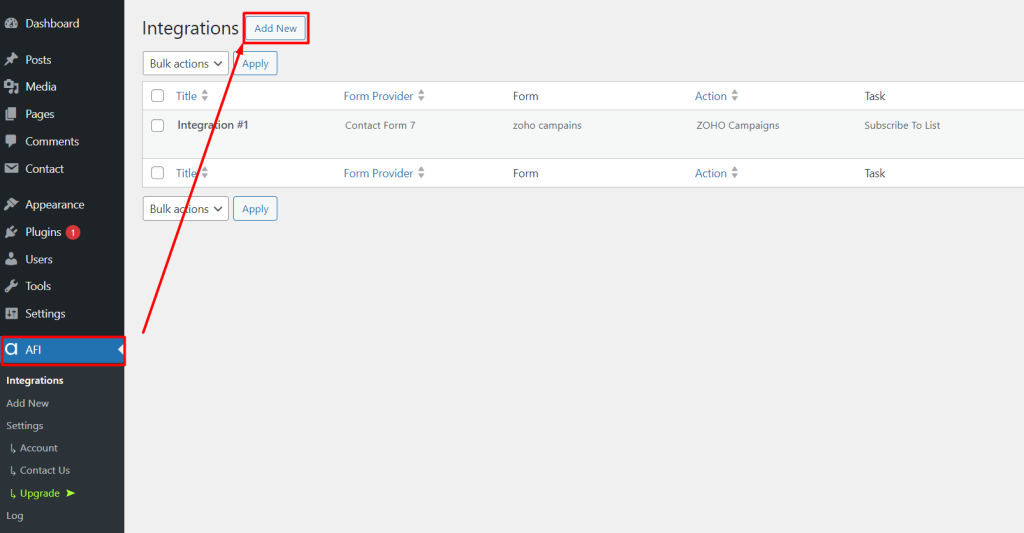
2. By default, a Title is added, but feel free to rename it for easier identification, especially when managing multiple integrations.
3. Under Trigger > Form/Data Provider, select the sender platform you want to integrate from the dropdown menu. For example, Contact Form 7, Gravity Forms, or Ninja Form. [Note: Make sure the selected plugin is installed and activated.]
4. Select the appropriate Form/Task Name from the drop-down menu.
5. Then in the Action > Platform dropdown, select Zoho CRM. AFI Pro users select Zoho CRM [PRO].
6. In Action > Task dropdown, select Add new record.

7. After you pick the task, you’ll see a part called “Map Fields.” Here, choose the Zoho account you authorized earlier.
8. Select a Zoho User (optional). These are admin users and the selected one will be the owner of the records created by this integration.
9. Then, pick the module that you want to work with, like Leads, Contacts, Accounts, Deals, and so on. Just choose one.
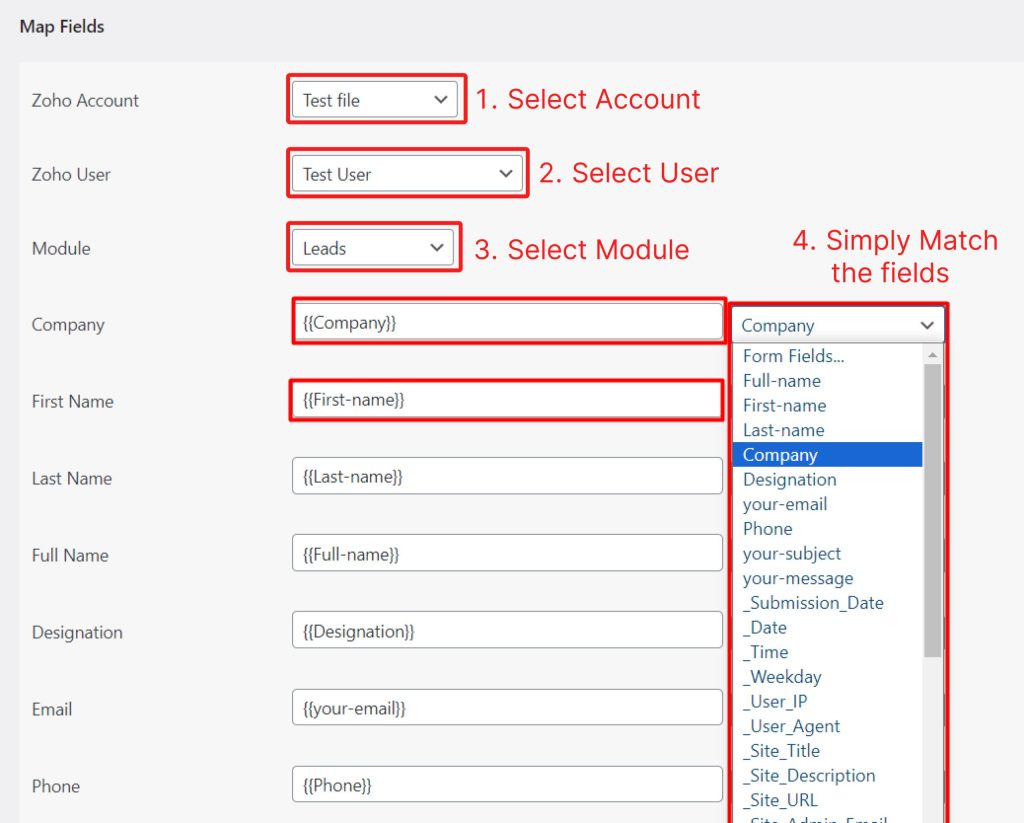
10. Once you’ve chosen a module, the plugin will fetch and show you the related fields. One integration can create a single record in a module. If you need multiple records in multiple modules from a single trigger, create separate integrations but select the same sender platform on all.
Lead
To make a new lead, first pick “Leads” from the Module dropdown menu. The plugin will bring up the relevant fields. You will have to match up the necessary fields from the Form Fields dropdown. Note that the Last Name field must be filled out since it is necessary for a Lead. Map additional fields to suit your needs.
Allow Duplicate: When the connection runs, it makes a new lead. But if there’s already a lead in your Zoho CRM with the same email, it updates that one instead. Tick the box if you don’t want it to update existing leads, and you always want it to make a new lead whenever there’s a new submission.
Duplicate Check Field: The system looks at the email address to update a lead. If you want to check it by other unique fields, enter the field name here.

Dropdown Fields: To automatically select dropdowns in Zoho CRM, one of the option values must be supplied. The plugin fetches a complete options list and shows below the field. Note them and make sure that when the connection runs, any one of the values is sent.

Date Fields: For dates, make sure you send the values in one of these formats: DD-MM-YYYY, MM/DD/YYYY, or YYYY-MM-DD.
Account
Like lead, you can also create an account by, selecting Account from the Module dropdown menu. The plugin will show the relevant fields. Make sure to align the necessary fields from the Form Fields dropdown. You can also map extra fields for further customization.
Required Field: Ensure to fill out the Account Name field, as it’s required.
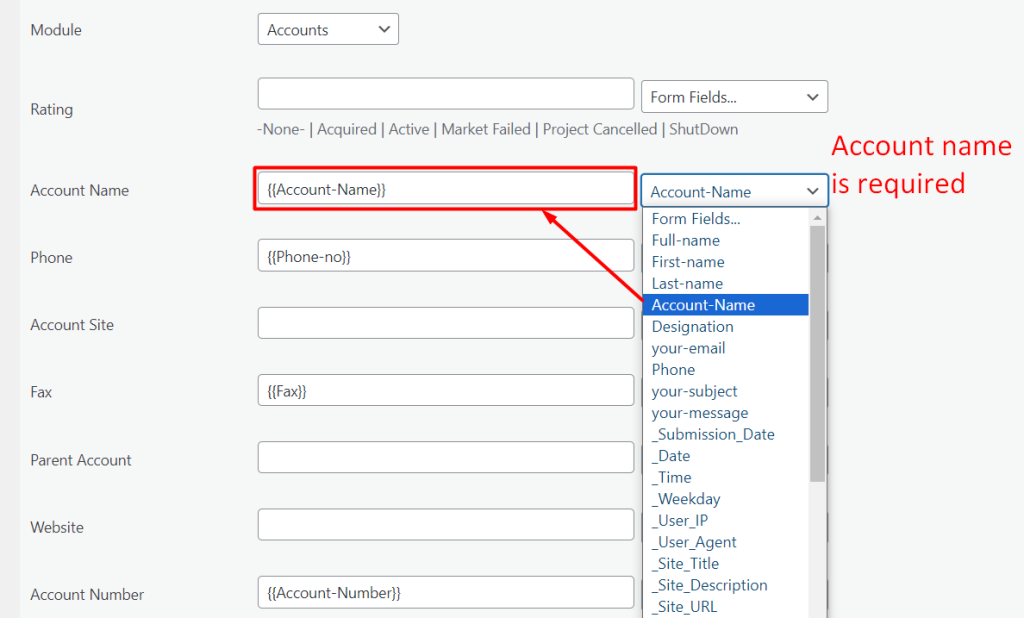
Dropdown Fields: To automatically pick options from dropdown menus in Zoho CRM, you need to provide one of the listed values. The plugin displays all available options below the field. Just make sure to choose one of these values when the connection runs for it to work correctly.

Contact
To create a new contact, start by selecting “Contacts” from the Module dropdown menu. The plugin will display the relevant fields. Ensure to match the required fields from the Form Fields dropdown. You can also map additional fields to customize as needed.
Required Field: Last Name, which is necessary for the Contacts module. This field must be completed.
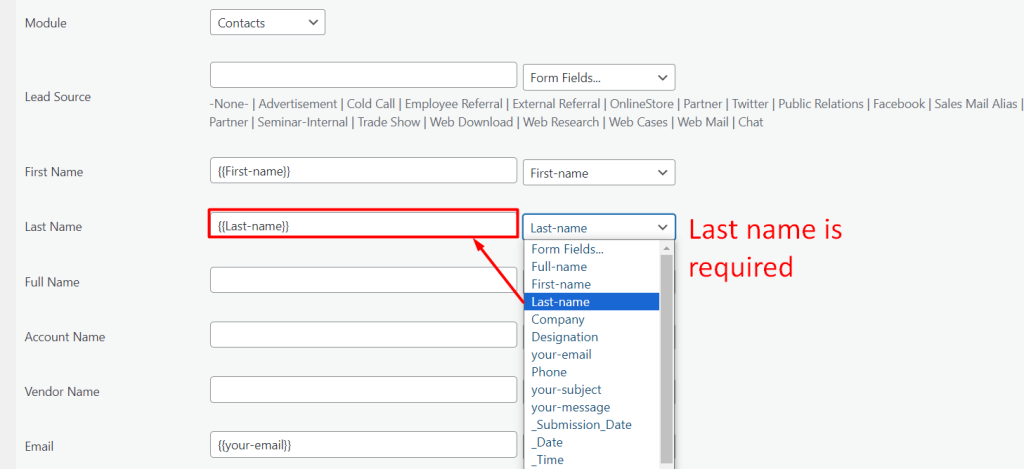
Lead Source: In this field, you can customize the options to match your situation.The plugin shows all available options below the field, choose one of the listed values to make it easy to identify each lead’s source.

Account Name: This field is used to associate a contact with a specific account or company. This field allows users to link a contact to the corresponding account record in the CRM system.
When an account name is provided, the system checks if a matching account exists. If found, the lead is linked to that account. If not, a new account is created and linked to the lead.
Deal
To create a new deal, you have to select “Deals” from the Module dropdown menu. The plugin will show the relevant fields. Make sure to align the necessary fields from the Form Fields dropdown. You can also map extra fields for further customization.
Required Field: Please keep in mind that fields such as Deal name, Stage, and Pipeline (mandatory when the pipeline is enabled) are required for the Deals module. These must be filled out. Map additional fields to suit your needs.
Stage: The “Stage” field tracks the progress of a deal through different stages of the sales process. It helps in organizing and managing deals based on their current stage, enabling users to identify and analyze deals at various points in the sales cycle.

Deal Name: Enter deal name.
Pipeline: Enter pipeline like stage.
Account Name: It helps organize deals and align them with relevant accounts in the CRM. You can connect deals with the corresponding account or company records in Zoho CRM, ensuring seamless integration between Deals, Leads, and Accounts modules.
This association allows users to access all deals related to a specific account and relevant account details during deal management, making organization easier.
Contact Email: The “Contact Email” field in the Deal module connects the deal with the contact’s email, ensuring emails are linked to the right people. This integration streamlines communication and works smoothly across Zoho CRM’s modules.
Deals are linked to contacts using the default contact lookup field. This ensures that emails about the deal are sent to the right contact’s email address. This setup streamlines communication and keeps everyone involved in the deal informed. Plus, the integration between modules in Zoho CRM lets users access all deals related to a specific account and relevant account details, making deal management easier.
Tags: The “Tags” field allows users to categorize and label deals with specific tags for better organization and classification.
This field allows users to create and assign their own tags to deals, making it flexible and customizable. This feature is especially handy when integrating with external data sources like Contact Form 7, as it adds an extra layer of organization and categorization for deals originating from form submissions.

Troubleshooting
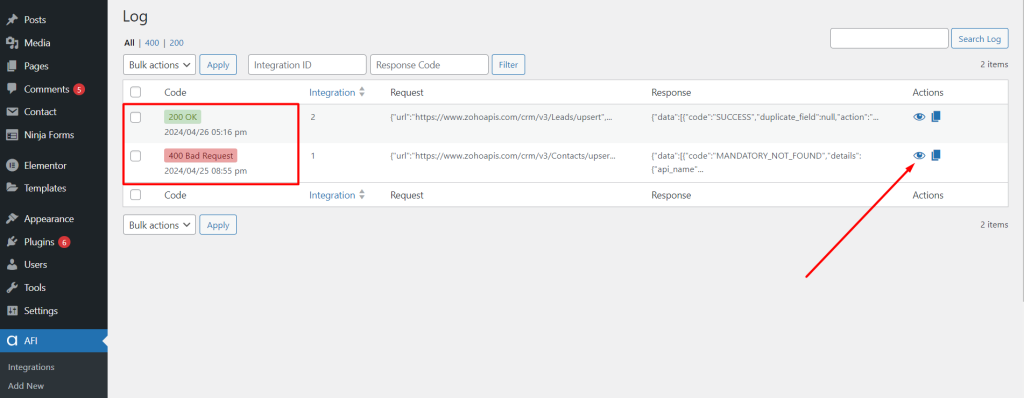
After setting up the integration, when users fill out and submit the form, the plugin starts sending data to the chosen platform. It also keeps a log that shows the data sent and the responses received from the platform.
If something goes wrong with the connection, start by checking the logs. Go to AFI > Log in the menu and look at the recent logs. You’ll probably see any mistakes listed there. Look into the requests and data returned for any errors. Usually, the error message tells you what went wrong. For example, it might say you forgot to give a last name or the phone number isn’t in the right format. Try fixing these problems on your own.
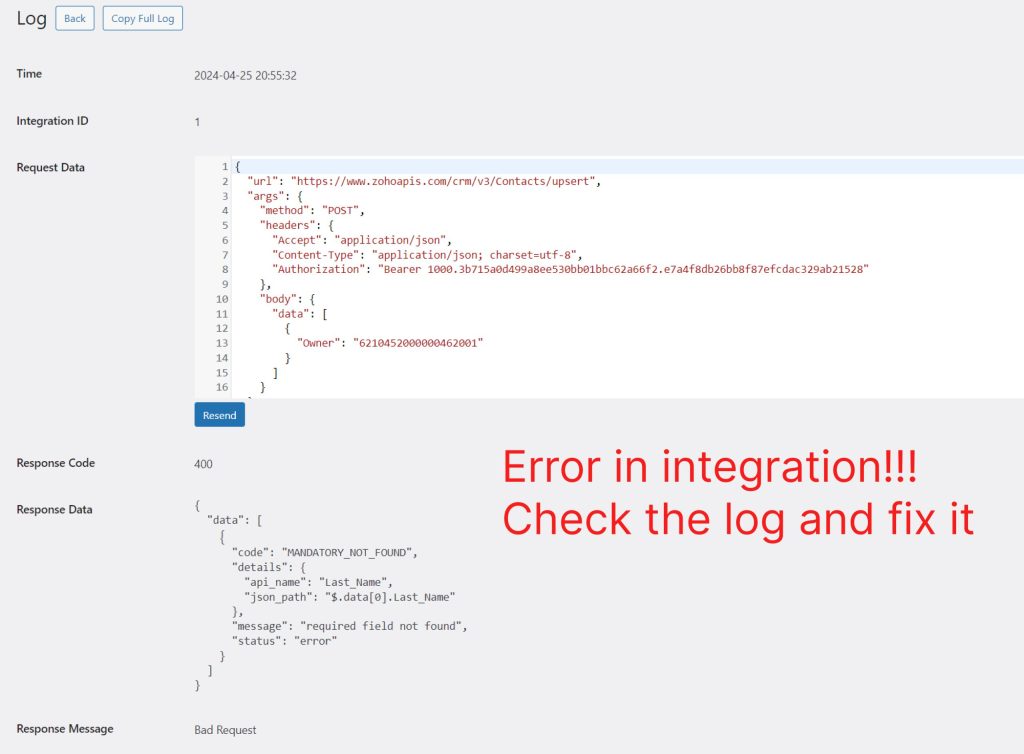

If you’re not sure what the error means, just copy the log and email it to su*****@*********************on.com for help.