How to Send Gravity Forms Submissions to ActiveCampaign

Written by Nasir Ahmed
PublishedAugust 2, 2026
Reading time3 min read

ActiveCampaign is a CRM and email marketing that helps you manage contacts and track interactions. Gravity Forms is one of the most powerful form plugins for WordPress. ActiveCampaign is where that data needs to go. Here is how to connect them without Zapier or code.

Why connect directly?

Cloud automation tools like Zapier charge per task and route your data through external servers. AFI processes everything on your WordPress site. No per-submission fees, no external dependencies.

What you will need

  • A WordPress site with Gravity Forms installed and at least one form.
  • A ActiveCampaign account.
  • The Advanced Form Integration plugin (free from WordPress.org).

Connect ActiveCampaign to AFI

  1. Log in to your Active Campaign account.
  2. Go to Settings → Developer and copy your API URL and Key.
  3. In WordPress, go to AFI → Settings → ActiveCampaign.
  4. Enter the API URL and Key, then click Save.

Setting up the integration

1. Create a new integration

Go to AFI → Add New. Name it Gravity Forms to ActiveCampaign.

2. Pick your trigger

Select Gravity Forms as the form provider and choose the form you want to connect. AFI detects the fields automatically.

3. Select ActiveCampaign as the destination

Choose ActiveCampaign from the platform dropdown and pick Add Contact. This creates or updates a contact in Active Campaign.

4. Map fields

Match each ActiveCampaign field on the left to the corresponding Gravity Forms field on the right. You can also use smart tags like {{_submission_date}} and {{utm_source}}.

5. Add conditions if needed

Only want to send certain submissions? Set up a conditional rule based on any form field value.

6. Save and test

Click Save Integration. Fill out your Gravity form and submit. Check ActiveCampaign to confirm the data arrived. If anything looks wrong, open AFI → Log to see the exact request and response.

Free vs Pro

The free version maps email, first name, and last name to ActiveCampaign with unlimited submissions. Pro adds custom field mapping and list assignment. No per-submission fees on any plan.

Frequently asked questions

Do I need coding skills?

No. Everything is configured through a visual interface, including field mapping.

Will adding this slow down my form?

No. AFI sends data to the destination after the form submission completes. Your visitors see the normal confirmation message without any delay.

Can I connect multiple Gravity Forms?

Yes. Create a separate integration for each form, or send one form to multiple platforms.

Get started

Install Advanced Form Integration free from WordPress.org and connect Gravity Forms to ActiveCampaign in minutes.
Leave a Reply

Your email address will not be published. Required fields are marked *

How to integrate Gravity Forms to ActiveCampaign Easily

Written by Nasir Ahmed
PublishedFebruary 1, 2021
Reading time3 min read

Overview

Advanced Form Integration plugin allows you to integrate Gravity Forms to ActiveCampaign. When a user fills a form on your website, the plugin will send the data to your ActiveCampaign account and create a contact in the preferred list, Deal and Note. You can also add custom merge fields and tags.

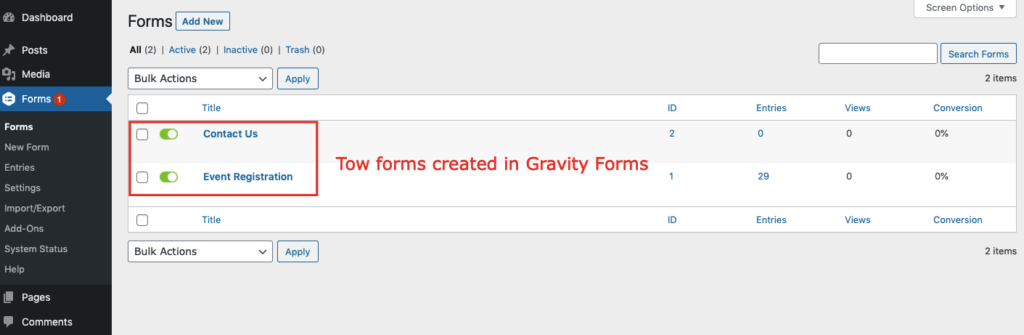
2 Sample Contact Forms

Supported Features

  • Create a new contact with all basic (First Name, Last Name, Email), Deal and Note. Additionally supports merged custom fields. It also allows adding the contact to preferred contact list, account and automation.

Requirements

  • The feature requires a Pro license. BUY NOW!
  • Make sure that the Pro version of the Advanced Form Integration plugin is installed and activated. You should have got the links in the email after purchase. You can also download it anytime by logging into the user dashboard.
  • Read plugin documentation for Gravity Forms and ActiveCampaign. It is not required but helpful for a better understanding.

Obtaining ActiveCampaign URL & API Key

Before start, you are required to save the URL & API Key in plugin settings.

  1. Go to AFI Plugin Settings and select ActiveCampaign.
  2. Log in to your AciveCampaign account.
  3. Go to Settings>Developer
  4. Copy the URL & API Key under API Access section.
  5. Paste them in the URL & Key input box and click Save Changes.

Create New Integration

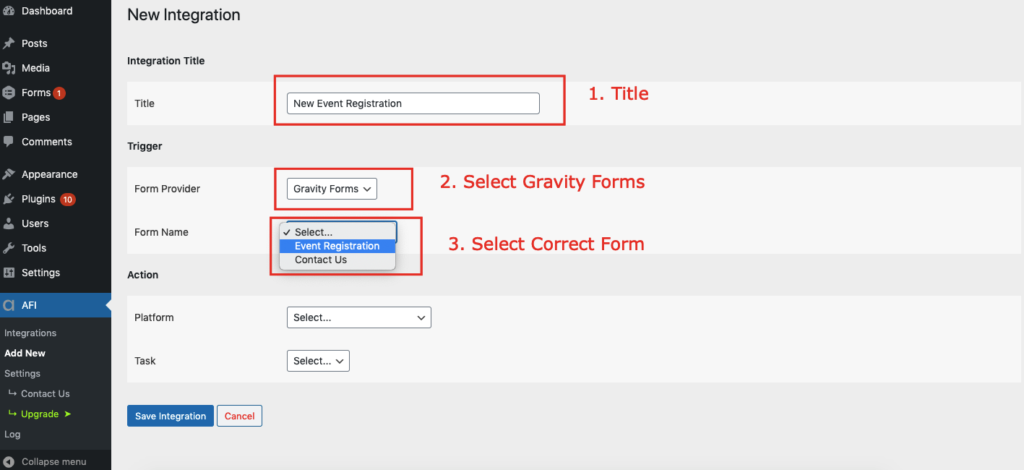
Once URL & API keys are saved you can start creating new integration. Click on Add New under AFI menu, New Integration page will appear.

Title

A default title will be auto-generated with an auto incremental number. You can rename it to something related to the task. It will help you to quickly recognize the correct one when there is multiple integrations setup.

Trigger

Select Gravity Forms in Form Provider dropdown. Gravity Forms plugin must be installed and activated otherwise you won’t see it listed. After selecting Gravity Forms, all forms built under Gravity Forms will be fetched and auto-populated in the Form/Task Name dropdown. Select the form that you want to integrate.

Gravity Forms
Gravity Forms – Trigger setup

Action

Select ActiveCampaign [PRO] in Platform dropdown.

ActiveCampaign- New Integration

Map Fields

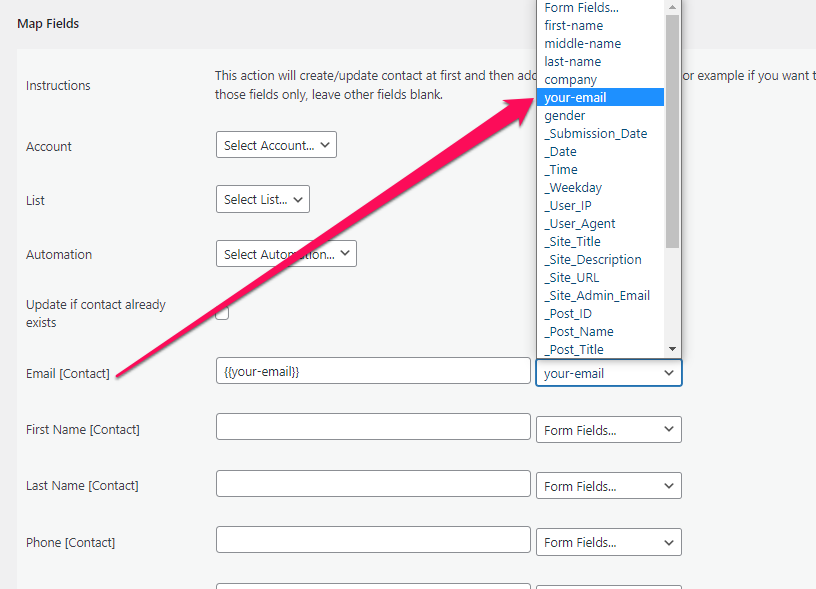
The first 3 dropdown lists will be auto-populated for available account, automation and contact lists. Skip the fields that not needed. Finally, click the Save Integration button.

ActiveCampaign- Map fields

Conditional Logic

Please check the documentation on Conditional Logic .

Frequently asked questions

Troubleshooting

Still need help?

Reach our support team at su*****@*********************on.com

Related Articles

Continue exploring these topics