Overview
The advanced Form Integration plugin allows you to integrate WP Fluent Forms with Google Calendar. When a user fills out a form on your website, the plugin will send the relevant data to your Google Calendar account and create a new event on a selected Google Calendar with supplied data.

Supported Features
- Allows you to create a new event on a selected Google Calendar with supplied data.
Requirements
- The feature requires a Pro license. BUY NOW!
- Make sure that the Pro version of the Advanced Form Integration plugin is installed and activated. You should have got the links in the email after purchase. You can also download it anytime by logging into the user dashboard.
- Read plugin documentation for WP Fluent Forms and Google Calendar. It is not required but helpful for a better understanding.
Set up Google Calendar API Connection
Before starting, you are required to set up the Google Calendar API connection in plugin settings.
- Go to the WordPress admin area, and click AFI > Settings.
- Activate Google Calendar and save. Open the Google Calendar tab.
- Go to Google Developer Console and create a New Project
- Go to Library side menu and search for Google Calendar API, open it and click ENABLE.
- Go to OAuth consent screen, select External click Create. Put an Applicatoin name as you want, select user support email, enter
taster.localin Authorized domains, put your email on developer contact email. In scopes calendar read/write scopes. then click Save. Please set the publishing status as in production, otherwise you might get a 403 error. - Go to Credentials, click CREATE CREDENTIALS, select OAuth client ID, select application type as Web application, click Create, put anything in Name, save
http://in Authorized redirect URIs, click Create.yourdomain.com/wp-json/advancedformintegration/googlecalendar - Copy Client ID and Client Secret from newly created app and save below.
- Click Save & Authorize, if appears App is not verified error click show advanced and then Go to App.
Create New Integration
Once the API connection is done you can start creating new integration. Click on Add New under the AFI menu, New Integration page will appear.
Title
A default title will be auto-generated with an auto incremental number. You can rename it to something related to the task. It will help you to quickly recognize the correct one when there is multiple integrations setup.
Trigger
Select WP Fluent Forms in the Form Provider dropdown. The WP Fluent Forms plugin must be installed and activated otherwise you won’t see it list

Action
Select Google Calendar in the Platform dropdown.
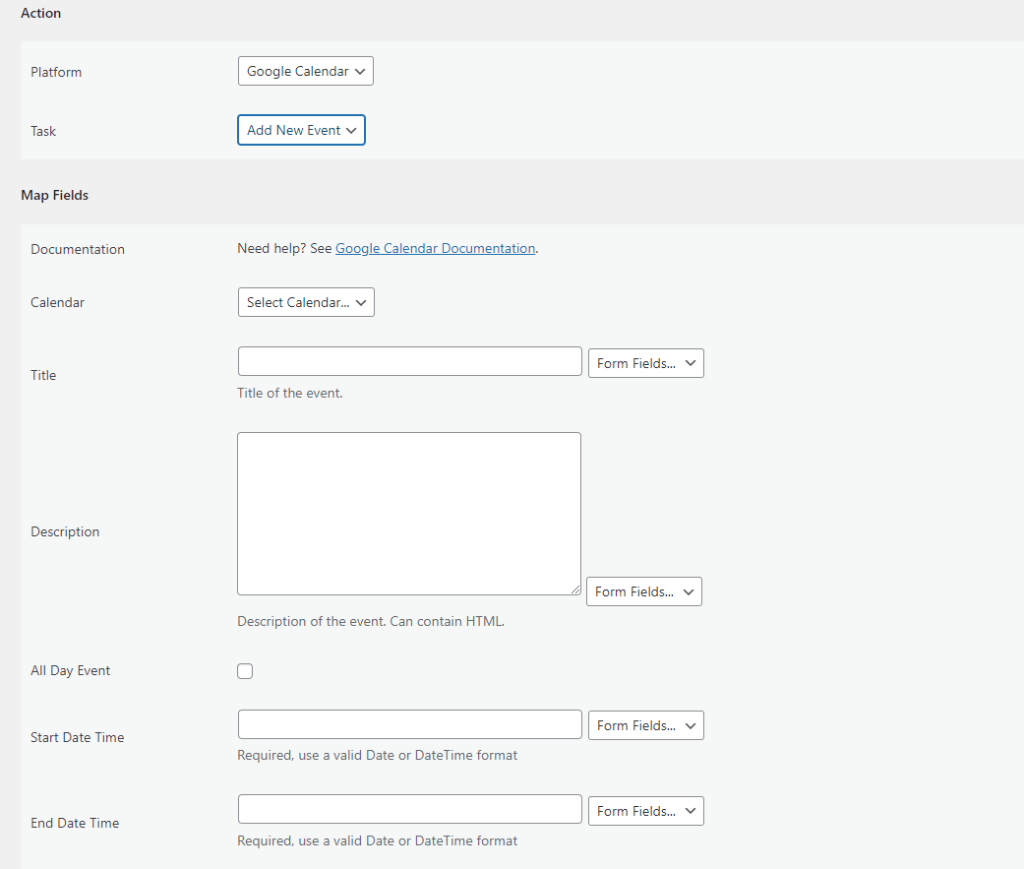
Map Fields
The Map Fields section will appear where you’ll be able to determine which fields to send. Map Email, First Name, Last Name, etc. fields with similar fields in the sender platform. Finally, click the Save Integration button.
Conditional Logic
Please check the documentation on Conditional Logic.
Frequently asked questions
Troubleshooting
Still, need help?
Reach our support team at su*****@*********************on.com