AFI
AFI
How to Send Contact Form 7 Submissions to GetResponse

Contact Form 7 is the most-installed form plugin on WordPress, and GetResponse is one of the most popular email marketing tools. The problem is that Contact Form 7 has no built-in way to send submissions to external platforms. The usual fix is Zapier, but that means a monthly subscription, a per-task meter, and your data routed through a third-party cloud.
This guide shows you how to connect Contact Form 7 to GetResponse directly from WordPress, with no code and no per-task fees. Every form submission is sent automatically.
What you will need
- A WordPress site with Contact Form 7 installed and at least one form created.
- A GetResponse account.
- The Advanced Form Integration plugin installed and activated.
Connect your GetResponse account
- Log in to your GetResponse account.
- Go to Tools → API & OAuth and copy your API Key.
- In WordPress, go to AFI → Settings → GetResponse.
- Paste the API Key and click Save Changes.
Step-by-step: Contact Form 7 to GetResponse
Step 1: Install Advanced Form Integration
In your WordPress dashboard, go to Plugins, then Add New, search for “Advanced Form Integration,” install it, and activate it.
Step 2: Connect GetResponse
Open Advanced Form Integration in the admin menu and go to Settings to connect your GetResponse account. Follow the steps above to save your credentials. This is a one-time step.
Step 3: Create a new integration
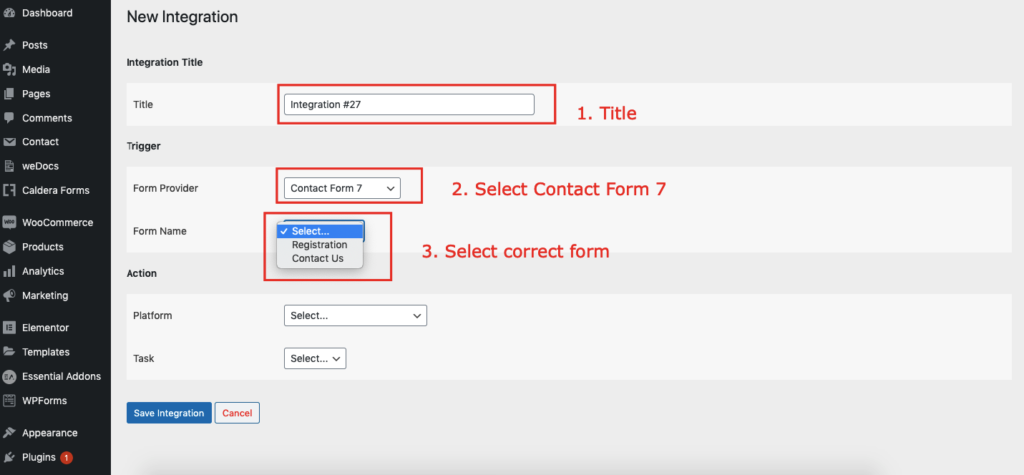
Click Add New Integration. You will choose a trigger (your form) and an action (GetResponse).
Step 4: Choose Contact Form 7 as the trigger
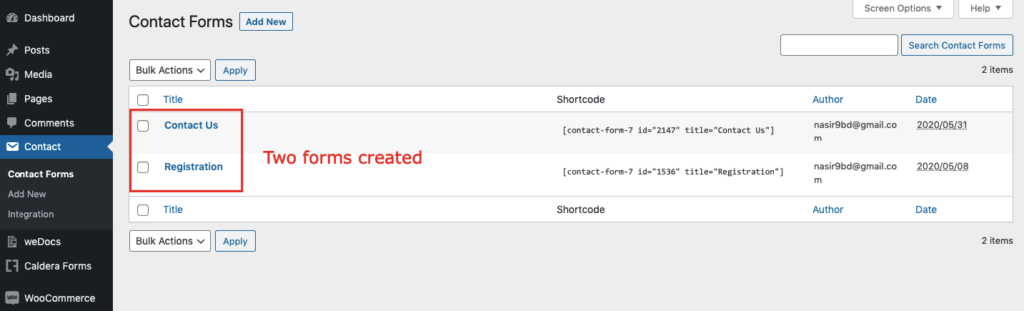
Select “Contact Form 7” as the form provider, then pick the specific form you want to connect, such as your “Contact Us” form. The plugin reads that form’s fields automatically.
Step 5: Choose GetResponse as the action
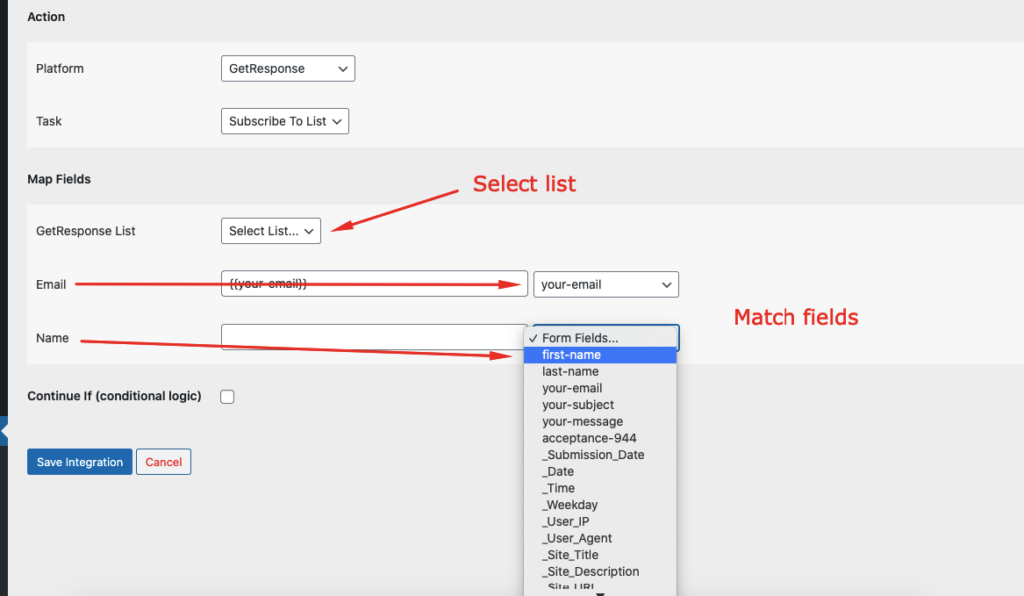
Select GetResponse as the destination and choose the “Add Contact” action. This adds the contact to a chosen GetResponse list.
Step 6: Map your fields
Match each Contact Form 7 field to the corresponding GetResponse field. You can also mix in static text and dynamic tags such as the submission date or a UTM campaign value.
Step 7: Add conditional logic (optional)
If you only want to send certain submissions, add a rule. For example, only send data when a specific field matches a value, so your email marketing stays clean.
Step 8: Save and test
Save the integration and submit a test entry on your form. The data appears in GetResponse in real time. Every call is recorded in the activity log, so if a submission ever fails you can see exactly why.
Free vs Pro
The free version sends email, name, and standard fields to GetResponse with no limit on the number of submissions. Pro adds custom field mapping. Submissions stay unlimited on every plan.
Frequently asked questions
Do I need to touch any code?
No. The whole setup is point and click, including the field mapping.
Will it slow down my forms?
No. The data is sent to GetResponse in the background after submission, so the form itself stays fast.
Can I connect more than one form?
Yes. You can create as many integrations as you like, from different forms to different actions, all from one dashboard.
Get started
Send your Contact Form 7 submissions straight into GetResponse without a monthly automation bill. Install Advanced Form Integration free from WordPress.org and connect your first form in a few minutes.